如何在 Outlook 中为多个电子邮件帐户设置不同的回复或转发签名?
来自以下教程:Outlook 邮件签名,您应该已经了解如何在 Outlook 中创建签名。但新建签名后,如果想在回复或转发邮件时插入,还需在邮件窗口中手动选择签名> 所创建的签名 进行插入。
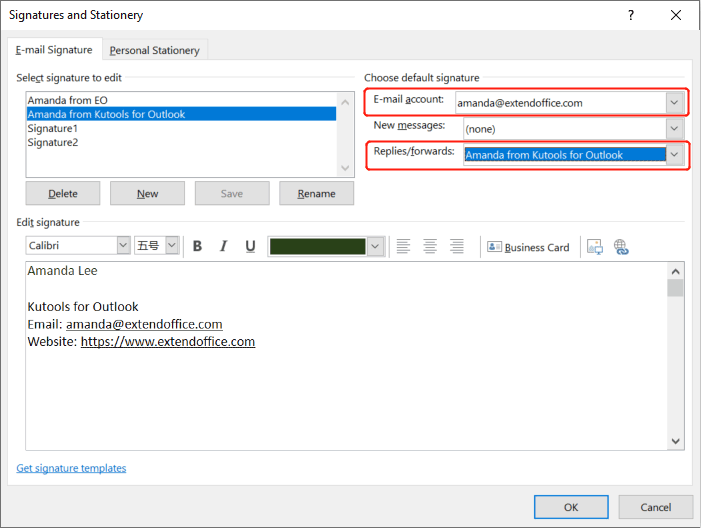
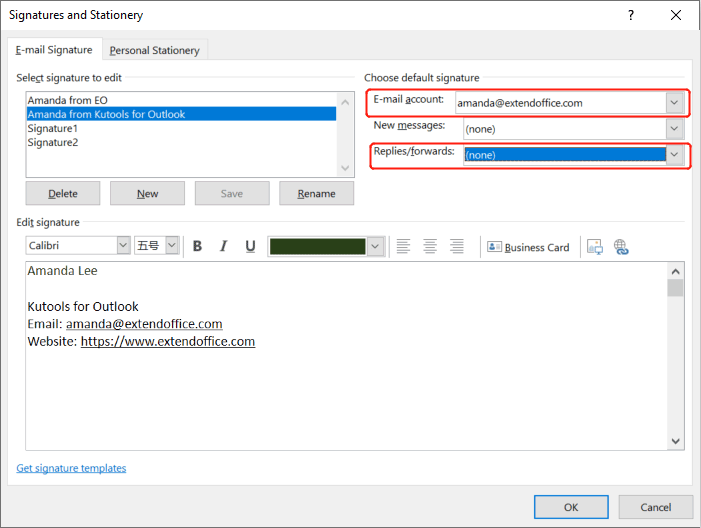
当然,您也可以点击签名> 签名,为特定电子邮件帐户配置签名,让 Outlook 在回复或转发新邮件时自动添加签名,如下所示。
但如果您拥有多个电子邮件账户,想要为每个账户批量添加不同的签名,该如何操作呢?本教程将为您介绍一种 VBA 方法,助您轻松实现这一需求。
如何在 Outlook 中回复或转发时为多个电子邮件帐户添加不同签名
1. 在 Outlook 中,按下 Alt+F11 键,即可打开 Microsoft Visual Basic for Applications 窗口。
2. 在 Microsoft Visual Basic for Applications 窗口中,双击 ThisOutlookSession,在项目面板下,将以下 VBA 代码复制到 ThisOutlookSession (代码) 窗口。参见截图:
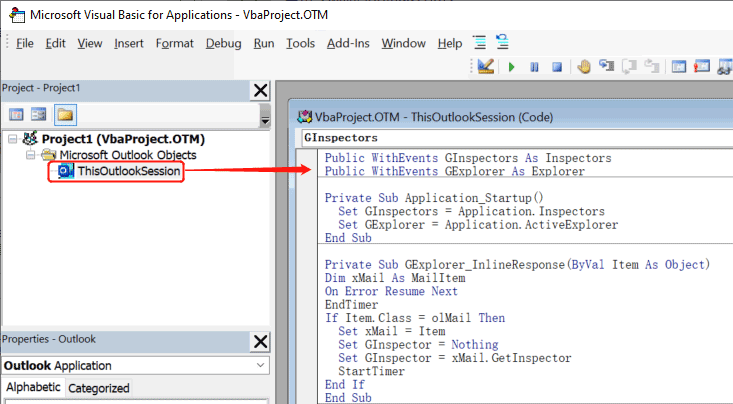
VBA 代码:在 Outlook 创建新建邮件时为多个电子邮件帐户添加不同签名 —— ThisOutlookSession
Public WithEvents GInspectors As Inspectors
Public WithEvents GExplorer As Explorer

Private Sub Application_Startup()
  Set GInspectors = Application.Inspectors
  Set GExplorer = Application.ActiveExplorer
End Sub

Private Sub GExplorer_InlineResponse(ByVal Item As Object)
‘Update by ExtendOffice
Dim xMail As MailItem
On Error Resume Next
EndTimer
If Item.Class = olMail Then
  Set xMail = Item
  Set GInspector = Nothing
  Set GInspector = xMail.GetInspector
  StartTimer
End If
End Sub

Private Sub GInspectors_NewInspector(ByVal Inspector As Inspector)
  On Error Resume Next
  EndTimer
  Set GInspector = Nothing
  Set GInspector = Inspector
  StartTimer
End Sub
3. 在 Microsoft Visual Basic for Applications 窗口,点击插入 > 模块。然后将以下 VBA 代码复制到模块窗口中。
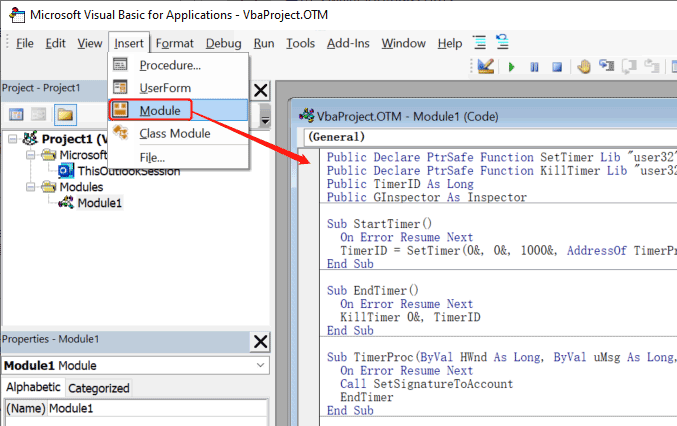
VBA 代码:在 Outlook 回复或转发时为多个电子邮件帐户添加不同签名 —— 模块
Public Declare PtrSafe Function SetTimer Lib "user32" (ByVal HWnd As Long, ByVal nIDEvent As Long, ByVal uElapse As Long, ByVal lpTimerFunc As LongPtr) As Long
Public Declare PtrSafe Function KillTimer Lib "user32" (ByVal HWnd As Long, ByVal nIDEvent As Long) As Long
Public TimerID As Long
Public GInspector As Inspector

Sub StartTimer()
  On Error Resume Next
  TimerID = SetTimer(0&, 0&, 1000&, AddressOf TimerProc)
End Sub

Sub EndTimer()
  On Error Resume Next
  KillTimer 0&, TimerID
End Sub

Sub TimerProc(ByVal HWnd As Long, ByVal uMsg As Long, ByVal nIDEvent As Long, ByVal dwTimer As Long)
  On Error Resume Next
  Call SetSignatureToAccount
  EndTimer
End Sub

Sub SetSignatureToAccount()
‘Update by ExtendOffice
Dim xMail As MailItem
Dim xSignatureFile, xSignaturePath As String
Dim xSubject As String
Dim xDoc As Document
Dim xAccount As Account
Dim xIsNew As Boolean
Dim xInspector As Inspector
Const PR_SMTP_ADDRESS As String = "http://schemas.microsoft.com/mapi/proptag/0x39FE001E"
On Error Resume Next
xSignaturePath = CreateObject("WScript.Shell").SpecialFolders(5) + "\Microsoft\Signatures\"
xSubject = GInspector.Caption
Set xDoc = GInspector.WordEditor
xIsNew = False
Set xMail = GInspector.CurrentItem
Select Case xMail.Parent.Parent
  Case "name1@example.com" 'Replace the email address in double quotes
    If VBA.InStr(xSubject, "RE: ") Then
      xSignatureFile = xSignaturePath & "Signature1.htm" 'Replace "Signature1" with your actual signature name that you will set as the signature when you reply to a message.
    ElseIf VBA.InStr(xSubject, "FW: ") Then
      xSignatureFile = xSignaturePath & "Signature2.htm" 'Replace "Signature2" with your actual signature name that you will set as the signature when you forward a message.
    Else
      xIsNew = True
      Exit Sub
    End If
  Case "name2@example.com" 'Replace the email address in double quotes
    If VBA.InStr(xSubject, "RE: ") Then
      xSignatureFile = xSignaturePath & "Signature3.htm" 'Replace "Signature3" with your actual signature name that you will set as the signature when you reply to a message.
    ElseIf VBA.InStr(xSubject, "FW: ") Then
      xSignatureFile = xSignaturePath & "Signature4.htm" 'Replace "Signature4" with your actual signature name that you will set as the signature when you forward a message.
    Else
      xIsNew = True
      Exit Sub
    End If
  'Add more Cases for more email accounts
End Select
If xIsNew = True Then
  With xDoc.Application.Selection
    .WholeStory
    .EndKey
    .InsertParagraphAfter
    .MoveDown Unit:=wdLine, Count:=1
    .InsertFile FileName:=xSignatureFile, Link:=False, Attachment:=False
  End With
Else
  With xDoc.Application.Selection
    .MoveRight Unit:=wdCharacter, Count:=1
    .HomeKey Emptyparam, Emptyparam
    .InsertFile FileName:=xSignatureFile, Link:=False, Attachment:=False
  End With
End If
Set xDoc = Nothing
Set GInspector = Nothing
Set xMail = Nothing
End Sub- 1) 您需要将 39 行和 48 行中的 name 1@example.com 和 name 2@example.com 替换为您实际的邮箱地址。
- 2) 您需要根据注释,将 41 行、43 行、50 行和 52 行中的 Signature 替换为您实际的签名名称。
- 3) 通过上述 VBA 代码,您可以为两个邮箱账户分别添加签名。如果您拥有更多账户,只需在代码第 57 行添加更多 Case 即可:
If VBA.InStr(xSubject, "RE: ") = 1 Then
xSignatureFile = xSignaturePath & "Signature 1.htm"
ElseIf VBA.InStr(xSubject, "FW: ") = 1 Then
xSignatureFile = xSignaturePath & "Signature 2.htm"
Else
xIsNew = True
Exit Sub
End If
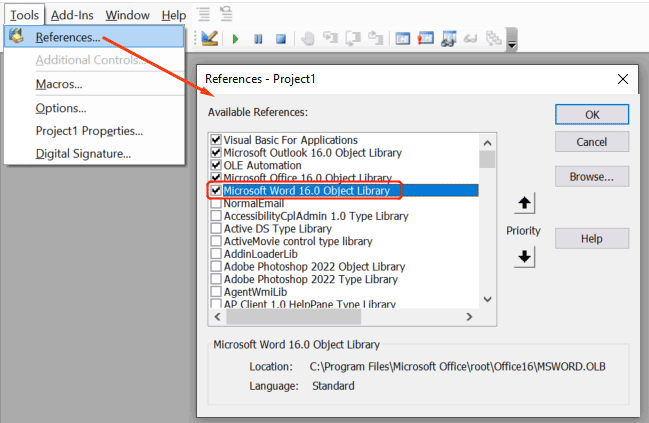
4. 在 Microsoft Visual Basic for Applications 窗口中,点击工具 > 引用,勾选 Microsoft Word 16.0 对象库,然后点击确定即可。
5. 重启 Outlook,并保存您的 VBA 代码。
6. 现在,当您使用已设置签名的电子邮件账户回复或转发邮件时,系统会自动添加相应的签名。
注意:如果您发现使用电子邮件帐户回复或转发邮件时出现了两个签名,请点击签名> 签名,在“选择默认签名”部分,选择出现两个签名的电子邮件帐户,然后在“回复/转发”下拉列表中选择(无)。
相关文章
例如,您从网站下载了一些 HTML 签名,想要将其导入到 Outlook。有没有简单的方法呢?本教程将为您详细介绍如何将 HTML 签名导入或插入到 Outlook。
在 Outlook 邮件中添加或移除背景颜色非常简单。那么,如果您想在 Outlook 签名中插入或去除背景颜色,该如何操作呢?以下方法将为您提供有效的解决方案:
如何在 Outlook 中为多个电子邮件帐户分别设置不同的签名,以便在新建邮件时自动应用?
如果您希望在创建新邮件时,Outlook 能自动添加签名,您需要点击“签名 > 签名”,并为指定的电子邮件账户设置默认签名,如下所示。但如果您拥有多个电子邮件账户,并希望批量为多个账户添加不同的签名,该怎么办呢?本教程将为您介绍一种 VBA 方法,助您轻松实现这一需求。
通常,您可以在 Outlook 中为不同账户设置不同的签名,但您是否尝试过为回复和转发邮件分别设置不同的签名呢?也就是说,回复邮件时自动插入签名 1,转发邮件时自动插入签名 2. 如何在 Outlook 中实现这一需求?
最佳办公效率工具
体验全新 Kutools for Outlook,畅享 100+ 强大功能!立即点击下载,不容错过!
🤖KUTOOLS AI:采用先进 AI 技术,轻松处理邮件,涵盖回复、摘要、优化、扩展、翻译及撰写等功能。
📧 邮件自动化:自动答复(支持 POP 和 IMAP)/定时发送邮件/发送邮件时按规则自动抄送密送/自动转发(高级规则)/自动添加称呼/自动将多收件人邮件拆分为单独信息……
📨 邮件管理:撤回邮件/按主题等条件拦截诈骗邮件/删除重复邮件/高级搜索/整合文件夹……
📁 附件增强:批量保存/批量分离/批量压缩/自动保存/自动拆离/自动压缩……
🌟 界面魔法:😊更多美观时尚表情/重要邮件到达时提醒您/最小化 Outlook 而不是直接关闭……
👍 一键精彩功能:带附件全部答复/反钓鱼邮件/🕘显示发送者当前时间时区……
👩🏼🤝👩🏻 联系人与日历:批量从选定邮件中提取添加联系人/将联系人组拆分为个人组/移除生日提醒……
在您的首选语言中畅享 Kutools —— 支持英语、西班牙语、德语、法语、中文等 40 多种语言!
一键解锁 Kutools for Outlook,告别等待,立即下载,让效率倍增!


🚀 一键下载 — 即可获取全部 Office 加载项
强烈推荐:Kutools for Office(5 合 1)
一键下载五个安装包,即可同时获得 Kutools for Excel、Outlook、Word、PowerPoint 和 Office Tab Pro。立即点击下载!
- ✅ 一键便捷:只需一次操作,即可下载全部五个安装包。
- 🚀 轻松应对各类 Office 任务:随时按需安装所需插件,助您高效办公,不容错过!
- 🧰 包含:Kutools for Excel / Kutools for Outlook / Kutools for Word / Office Tab Pro / Kutools for PowerPoint