如何将 Outlook 中全天事件的默认状态更改为“忙碌”?
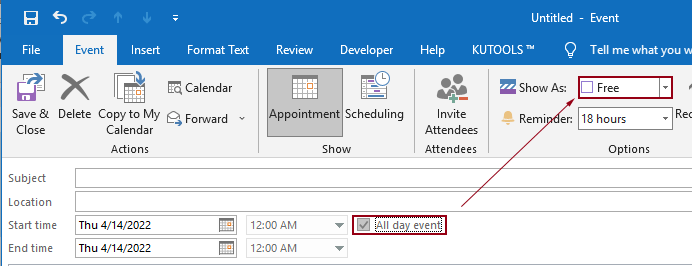
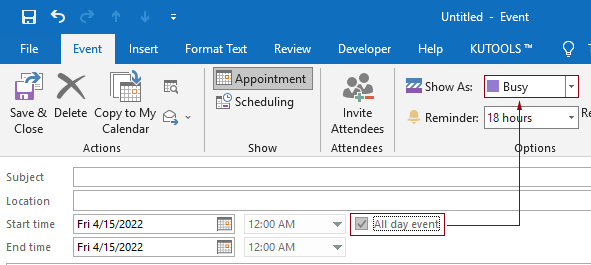
默认情况下,Outlook 会将约会和会议的状态设置为“忙碌”,而全天事件则显示为“空闲”(如图所示)。每次创建全天事件时,您都需要手动将“显示为”状态更改为“忙碌”。本文将为您介绍两种方法,帮助您将全天事件的默认显示状态更改为“忙碌”。
通过创建自定义表单将全天事件默认状态设置为忙碌
自定义表单可协助您创建默认“显示为”状态为“忙碌”的全天事件。请按照以下步骤操作。
1. 切换到日历视图,点击“开始”>“新建约会”。
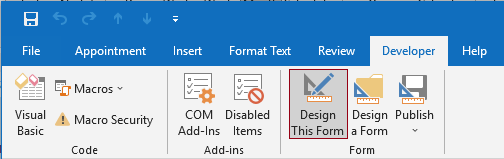
2. 在新建约会窗口中,点击“开发工具”>“设计此表单”。
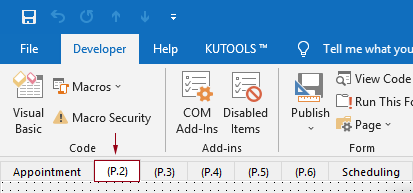
提示:如果“开发工具”选项卡未显示在功能区上,请按照本文中的方法进行设置。
3. 此时,约会窗口将切换至设计模式,您需要点击“(P.2)”选项卡。
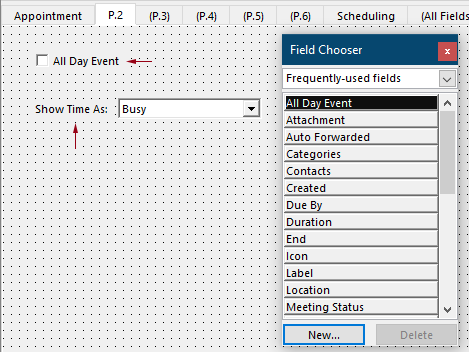
4. 将“全天事件”字段和“忙闲状态”字段分别从“字段选择器”窗格拖动到“(P.2)”选项卡下的面板中。
5. 右键单击已拖出的“全天事件”字段,在右键菜单中选择“属性”。
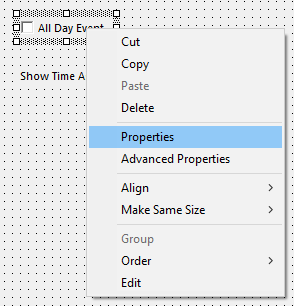
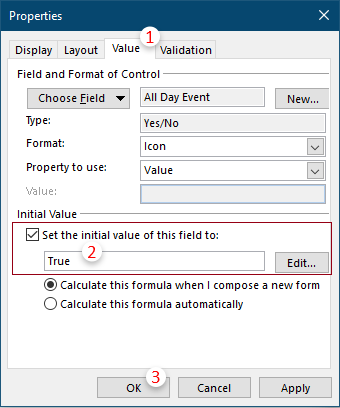
6. 在“属性”对话框中,请按如下方式进行设置。
7. 右键单击“忙闲状态”字段的下拉框,在弹出的右键菜单中选择“属性”。
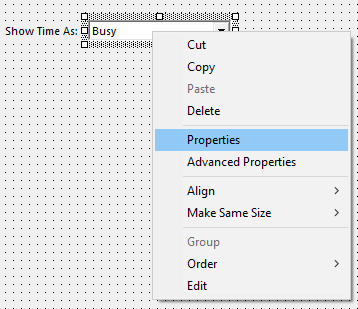
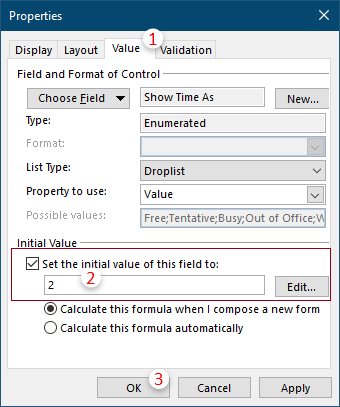
8. 在“属性”对话框中,请按照以下方式进行设置。
9. 在功能区中点击“发布”>“发布表单为”。
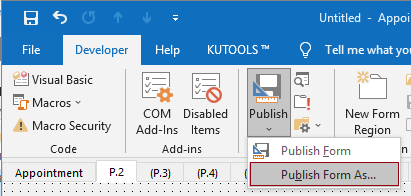
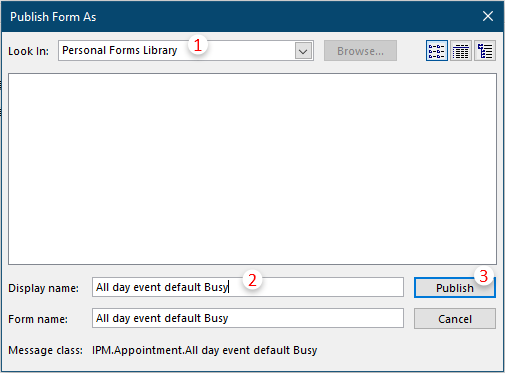
10. 在“发布表单为”对话框中,您需要完成以下操作:
11. 关闭约会窗口且不进行保存。
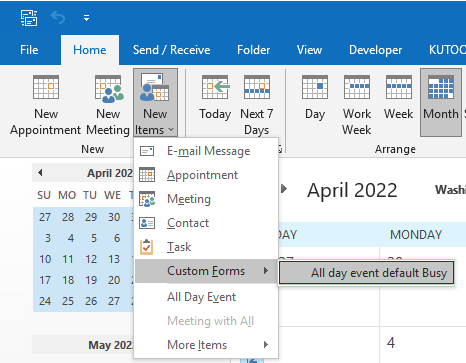
12. 从现在开始,每当您需要创建默认“显示为”忙碌状态的全天事件时,只需切换到“日历”视图,点击“开始”>“新建项目”>“自定义表单”>“自定义表单名称”即可。
注意:如需创建默认“显示为”空闲状态的全天事件,只需按照常规步骤操作:点击“开始”>“新建约会”,在“约会”窗口中勾选“全天事件”复选框即可。
通过使用 VBA 将全天事件默认状态设置为忙碌
上述方法步骤较为繁琐。如果您经常需要创建默认“显示为”忙碌状态的全天事件,不妨尝试以下 VBA 代码,轻松实现这一功能。
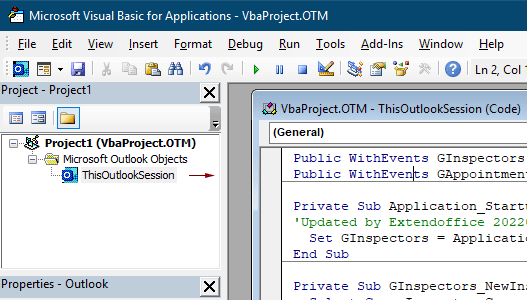
1. 启动 Outlook 后,同时按下“Alt”+“F11”键,打开“Microsoft Visual Basic for Applications”窗口。
2. 在“Microsoft Visual Basic for Applications”窗口中,双击“Project 1”>“Microsoft Outlook Objects”>“ThisOutlookSession”,即可打开“ThisOutlookSession (代码)”窗口。然后,将以下代码粘贴到该窗口中。
VBA 代码:将全天事件默认状态设置为“忙碌”
Public WithEvents GInspectors As Inspectors
Public WithEvents GAppointmentItem As AppointmentItem

Private Sub Application_Startup()
'Updated by Extendoffice 20220413
  Set GInspectors = Application.Inspectors
End Sub

Private Sub GInspectors_NewInspector(ByVal Inspector As Inspector)
  Select Case Inspector.CurrentItem.Class
    Case olAppointment
      Set GAppointmentItem = Inspector.CurrentItem
  End Select
End Sub

Private Sub GAppointmentItem_Open(Cancel As Boolean)
  Select Case GAppointmentItem.AllDayEvent
    Case True
      GAppointmentItem.BusyStatus = olBusy
  End Select
End Sub

Private Sub GAppointmentItem_PropertyChange(ByVal Name As String)
  If Name = "AllDayEvent" Then
    Select Case GAppointmentItem.AllDayEvent
      Case True
        GAppointmentItem.BusyStatus = olBusy
    End Select
  End If
End Sub
3. 保存 VBA 代码后,重启 Outlook。
从现在开始,每当您将约会或会议转换为全天事件时,“显示为”状态将自动设为“忙碌”。
相关文章
更改 Outlook 全天事件的默认提醒时间
通常,Outlook 2007/2010 中全天事件的默认提醒时间为 18 小时,而 Outlook 2013 中为 0.5 天。默认提醒时间有时可能与您的工作安排不符。本文将为您介绍如何更改 Microsoft Outlook 全天事件的默认提醒时间,助您高效管理日程。
更改 Outlook 默认跟进时间
如您所知,在 Outlook 中为邮件添加跟进提醒时,默认跟进时间为下午 4:30(或根据您的工作时间为其他时间)。不过,您可能希望将默认跟进时间调整为在工作时间开始时提醒您,例如上午 9:00. 本文将为您详细演示如何更改 Outlook 默认跟进时间,助您高效管理日程,不容错过!
更改 Outlook 默认归档位置
Outlook 默认会为归档文件指定保存位置。除了默认路径,您还可以自定义归档文件的保存位置。本教程将为您详细演示如何在 Outlook 中更改默认归档位置,轻松满足个性化需求。
更改 Outlook 默认附件保存区域
每次启动 Outlook 都要重新查找附件保存位置,是否让您感到烦恼?本教程将教您如何轻松更改默认附件保存位置。设置完成后,每次保存附件时,无论是否重启 Outlook,系统都会自动打开您指定的附件保存文件夹。
更改 Outlook 延迟发送默认时间
本教程为您提供一段 VBA 代码,助您轻松更改 Outlook 延迟发送选项的默认时间。
最佳办公效率工具
体验全新 Kutools for Outlook,畅享 100+ 强大功能!立即点击下载,不容错过!
🤖KUTOOLS AI:采用先进 AI 技术,轻松处理邮件,涵盖回复、摘要、优化、扩展、翻译及撰写等功能。
📧 邮件自动化:自动答复(支持 POP 和 IMAP)/定时发送邮件/发送邮件时按规则自动抄送密送/自动转发(高级规则)/自动添加称呼/自动将多收件人邮件拆分为单独信息……
📨 邮件管理:撤回邮件/按主题等条件拦截诈骗邮件/删除重复邮件/高级搜索/整合文件夹……
📁 附件增强:批量保存/批量分离/批量压缩/自动保存/自动拆离/自动压缩……
🌟 界面魔法:😊更多美观时尚表情/重要邮件到达时提醒您/最小化 Outlook 而不是直接关闭……
👍 一键精彩功能:带附件全部答复/反钓鱼邮件/🕘显示发送者当前时间时区……
👩🏼🤝👩🏻 联系人与日历:批量从选定邮件中提取添加联系人/将联系人组拆分为个人组/移除生日提醒……
在您的首选语言中畅享 Kutools —— 支持英语、西班牙语、德语、法语、中文等 40 多种语言!
一键解锁 Kutools for Outlook,告别等待,立即下载,让效率倍增!


🚀 一键下载 — 即可获取全部 Office 加载项
强烈推荐:Kutools for Office(5 合 1)
一键下载五个安装包,即可同时获得 Kutools for Excel、Outlook、Word、PowerPoint 和 Office Tab Pro。立即点击下载!
- ✅ 一键便捷:只需一次操作,即可下载全部五个安装包。
- 🚀 轻松应对各类 Office 任务:随时按需安装所需插件,助您高效办公,不容错过!
- 🧰 包含:Kutools for Excel / Kutools for Outlook / Kutools for Word / Office Tab Pro / Kutools for PowerPoint