如何在Outlook中根据收件人自动更改签名?
默认情况下,Outlook 具有内置功能,允许用户在通过不同电子邮件账户发送邮件时自动更改签名。但除此之外,我将向您展示如何根据“收件人”字段中的不同收件人自动更改签名的方法。
使用VBA代码根据收件人自动更改签名
请按照以下步骤在Outlook中发送电子邮件时为相应的收件人应用不同的签名。
1. 首先,您需要禁用Outlook中的自动附加签名功能。请点击 文件 > 选项 打开Outlook选项窗口。
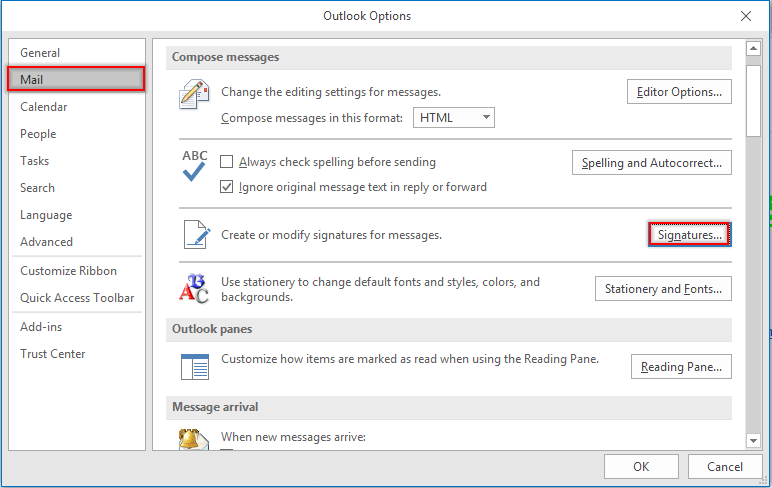
2. 在Outlook选项窗口中,在左侧窗格中选择 邮件 ,然后点击撰写邮件部分中的 签名 按钮。参见截图:

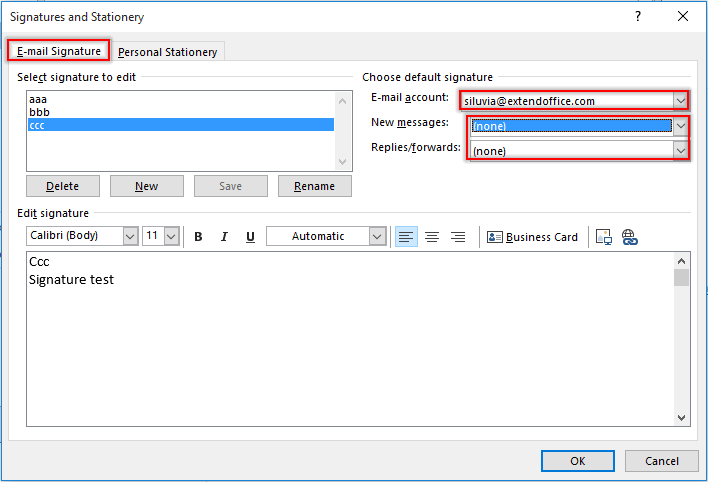
3. 在“签名和信纸”对话框中,转到“电子邮件签名”选项卡下的“选择默认签名”部分,在“电子邮件账户”下拉列表中选择一个电子邮件账户,然后从“新邮件”和“答复/转发”下拉列表中选择(无)。重复这些步骤,直到所有电子邮件账户都设置为(无)。然后单击 确定 按钮。

注意:您还可以在此“签名和信纸”对话框中创建所需的签名。
4. 当返回Outlook选项窗口时,单击 确定 按钮。
5. 按 Alt + F11 键打开 Microsoft Visual Basic for Applications窗口。
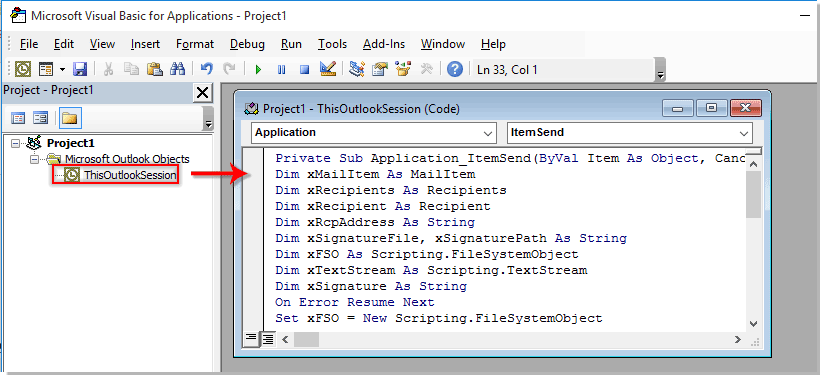
6. 在 Microsoft Visual Basic for Applications窗口中,双击左侧窗格中的ThisOutlookSession以打开代码窗口,并将下面的VBA代码复制到该窗口中。参见截图:

VBA代码:根据Outlook中的收件人自动更改签名
Private Sub Application_ItemSend(ByVal Item As Object, Cancel As Boolean)
'Updated by ExtendOffice 2022/08/01
Dim xMailItem As MailItem
Dim xRecipients As Recipients
Dim xRecipient As Recipient
Dim xRcpAddress As String
Dim xSignatureFile, xSignaturePath As String
Dim xFSO As Scripting.FileSystemObject
Dim xDoc As Document
Dim xFindStr As String
On Error Resume Next
Set xFSO = New Scripting.FileSystemObject
If Item.Class <> olMail Then Exit Sub
Set xMailItem = Item
Set xRecipients = xMailItem.Recipients
xSignaturePath = CreateObject("WScript.Shell").SpecialFolders(5) + "\Microsoft\Signatures\"
For Each xRecipient In xRecipients
    If xRecipient.AddressEntry.AddressEntryUserType = olExchangeUserAddressEntry Then
        xRcpAddress = xRecipient.AddressEntry.GetExchangeUser.PrimarySmtpAddress
    Else
        xRcpAddress = xRecipient.AddressEntry.Address
    End If
    Select Case xRcpAddress
        Case "Email Address 1"
            xSignatureFile = xSignaturePath & "aaa.htm"
            Exit For
        Case "Email Address 2", "Email Address 3"
            xSignatureFile = xSignaturePath & "bbb.htm"
            Exit For
        Case "Email Address 4"
            xSignatureFile = xSignaturePath & "ccc.htm"
            Exit For
    End Select
Next
VBA.DoEvents
Set xDoc = xMailItem.GetInspector.WordEditor
xFindStr = "From: " & xMailItem.Recipients.Item(1).Name & " <" & xRcpAddress & ">"
If VBA.InStr(1, xMailItem.Body, xFindStr) <> 0 Then
    xDoc.Application.Selection.HomeKey Unit:=wdStory, Extend:=wdMove
    With xDoc.Application.Selection.Find
        .ClearFormatting
        .Text = xFindStr
        .Execute Forward:=True
    End With
    With xDoc.Application.Selection
        .MoveLeft wdCharacter, 2
        .InsertParagraphAfter
        .MoveDown Unit:=wdLine, Count:=1
    End With
Else
    With xDoc.Application.Selection
        .EndKey Unit:=wdStory, Extend:=wdMove
        .InsertParagraphAfter
        .MoveDown Unit:=wdLine, Count:=1
    End With
End If
xDoc.Application.Selection.InsertFile FileName:=xSignatureFile, Link:=False, Attachment:=False
End Sub
注意事项:
- 1). 在VBA代码中,请将“电子邮件地址1/2/3/4”替换为特定收件人的电子邮件地址。
- 2). “aaa.htm”、“bbb.htm”和“ccc.htm”是您要发送给相应收件人的指定签名。
- 3). 在这种情况下,签名“aaa”将发送给“电子邮件地址1”,签名“bbb”将发送给“电子邮件地址2”和“电子邮件地址3”,而“电子邮件地址4”将收到嵌入签名“ccc”的电子邮件。请根据您的需求进行更改。
- 4). 如果一封电子邮件中有多个收件人,代码只考虑第一个收件人。在这种情况下,其他收件人将收到与第一个收件人相同签名的电子邮件。
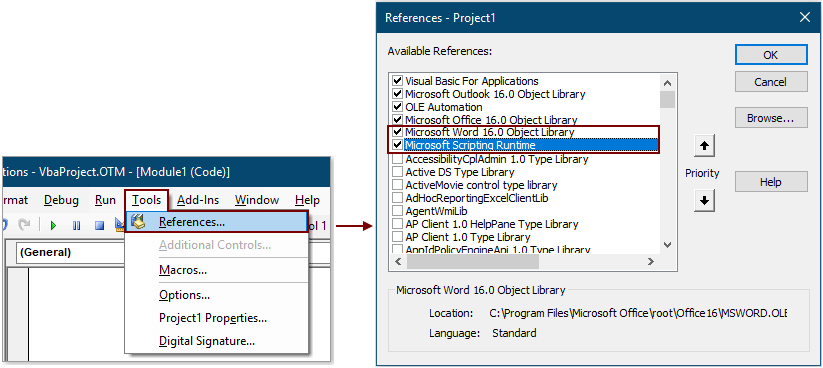
7. 然后点击 工具 > 引用 进入“引用-项目”对话框。在对话框中,请同时勾选 Microsoft Word 对象库 和 Microsoft 脚本运行时 选项,然后单击 确定 按钮,参见截图:

8. 按 Alt + Q 键关闭Microsoft Visual Basic for Applications窗口。
从现在开始,在撰写电子邮件并点击发送按钮后,将根据“收件人”字段中的电子邮件地址自动在邮件正文末尾插入相应的签名。
在Outlook中发送电子邮件时自动插入当前日期作为签名:
如果您希望在Outlook中创建/回复/转发新邮件时将时间戳插入邮件正文作为签名,可以启用 Kutools for Outlook 的“在新建、回复和转发邮件时添加日期签名 ”选项来实现。参见截图:立即下载并试用 (30-天免费试用)

最佳 Office 办公效率工具
最新消息:Kutools for Outlook 推出免费版!
体验全新 Kutools for Outlook,超过100 种强大功能!立即点击下载!
🤖 Kutools AI :采用先进的 AI 技术,轻松处理邮件,包括答复、总结、优化、扩展、翻译和撰写邮件。
📧 邮箱自动化:自动答复(支持 POP 和 IMAP) /计划发送邮件 /发送邮件时按规则自动抄送密送 / 自动转发(高级规则) / 自动添加问候语 / 自动将多收件人的邮件分割为单独邮件 ...
📨 邮件管理:撤回邮件 / 按主题及其他条件阻止欺诈邮件 / 删除重复邮件 / 高级搜索 / 整合文件夹 ...
📁 附件增强:批量保存 / 批量拆离 / 批量压缩 / 自动保存 / 自动拆离 / 自动压缩 ...
🌟 界面魔法:😊更多美观酷炫的表情 /重要邮件到达时提醒 / 最小化 Outlook 而非关闭 ...
👍 一键高效操作:带附件全部答复 / 防钓鱼邮件 / 🕘显示发件人时区 ...
👩🏼🤝👩🏻 联系人与日历:批量添加选中邮件中的联系人 / 分割联系人组为单独的组 / 移除生日提醒 ...
可根据您偏好选择 Kutools 使用语言——支持英语、西班牙语、德语、法语、中文及40 多种其他语言!
只需点击一下即可立即激活 Kutools for Outlook。无需等待,立即下载,提升工作效率!


🚀 一键下载——获取所有 Office 插件
强烈推荐:Kutools for Office(五合一)
一键下载五个安装包:Kutools for Excel、Outlook、Word、PowerPoint以及 Office Tab Pro。 立即点击下载!
- ✅ 一键便利操作:一次下载全部五个安装包。
- 🚀 随时满足 Office任务需求:需要哪个插件随时安装即可。
- 🧰 包含:Kutools for Excel / Kutools for Outlook / Kutools for Word / Office Tab Pro / Kutools for PowerPoint