Excel 教程 – 从 Excel 发送电子邮件
通常,我们使用 Outlook、Gmail 等电子邮件客户端来发送邮件。然而,许多人将数据存储在 Excel 工作表中,并在处理数据时需要将部分信息快速分享给他人。为此,他们希望直接从 Excel 工作表发送电子邮件,以省去切换至邮件客户端的繁琐操作。本分步教程将为您详细介绍如何在不同条件下从 Excel 发送电子邮件。
注意:在使用以下方法前,请先在您的计算机上配置 Outlook 电子邮件客户端,并将其设为默认邮件程序。
目录:[ 隐藏 】
1. 掌握从 Excel 发送电子邮件的基础知识
本节将为您介绍如何从 Excel 发送电子邮件的基础操作。
1.1 使用 Excel 内置功能从 Excel 发送电子邮件
如果您只需从 Excel 发送一封简单电子邮件,仅包含收件人、主题、抄送和正文字段,即可直接使用 Excel 的内置功能轻松实现。
如下表所示,若要根据指定字段从 Excel 发送不同的电子邮件,您只需使用该字段对应的单元格引用创建相应的超链接公式即可。创建完成后,单击任一链接便可自动发送对应邮件。
注意:若“收件人”或“抄送”字段包含多位收件人,请使用分号分隔。

本节分为四个部分,依次为您演示如何将邮箱地址、抄送收件人、主题行和正文文本逐一添加到超链接公式中。请按以下步骤操作。
“HYPERLINK”函数的语法及参数如下。
语法
HYPERLINK(link_location, [friendly_name])
参数
此处,我们使用“mailto:”作为公式的一部分来指定电子邮件收件人。在本例中,第一位收件人的邮箱地址位于单元格 B2 中,因此需在公式中添加“mailto:”并引用单元格 B2.
“mailto:”&B2
1. 请选择一个单元格用于显示超链接。本例中,我选择了单元格 F2.
2. 然后在其中输入以下公式:
=HYPERLINK("mailto:"&B2)
注意:按下“Enter 键”后,将生成如下图所示的超链接。单击该链接时,系统会自动打开 Outlook 并创建新邮件,同时将收件人的邮箱地址自动填入“收件人”字段。

收件人的邮箱地址现已嵌入超链接公式中。请继续执行以下步骤,按需添加主题行、抄送收件人及正文内容。
要将抄送收件人添加到超链接函数中,请在公式中加入“?cc=”,如下所示。
单元格 F2 中的公式应如下所示:
=HYPERLINK("mailto:" & B2 & "?cc=" & C2)
要在超链接函数中添加主题行,请在公式中加入“&subject=”,如下所示。
此时,单元格 F2 中的公式应如下所示:
=HYPERLINK("mailto:" & B2 & "?cc=" & C2 & "&subject="& D2)
最后一步是将正文文本添加到超链接公式中。如示例所示,E2 中的两行文本由换行符分隔,您希望在邮件正文中保留该换行符。那么,Outlook 能否识别这一换行符呢?让我们来验证一下。
要在超链接公式中添加正文文本,您只需在公式中加入“&body=”即可,如下所示。
此时,单元格 F2 中的公式显示如下:
=HYPERLINK("mailto:" & B2 & "?cc=" & C2 & "&subject="& D2 & "&body="& E2)
注意:按下“ENTER 键”并单击该链接后,您将在新建邮件中看到邮件正文内容显示在同一行。

若要在邮件正文中显示多行文本,您需修改单元格内容,并在需要换行的位置插入回车符字符代码“%0A”。如下图所示:

在上述步骤中,我们已完成超链接公式中与电子邮件字段相关的 Link_location 参数。接下来,本节将完成下一个参数 【friendly_name】。
本例中,我希望超链接单元格显示为“Email to xx”,其中 xx 为 A2 单元格中的收件人姓名。因此,F2 中的公式应修改为:
=HYPERLINK("mailto:" & B2 & "?cc=" & C2 & "&subject="& D2 & "&body="& E2, "Email to "&A2)按下“Enter 键”即可获取结果。

选中该公式所在的单元格,向下拖动其“自动填充句柄”,即可快速生成其他电子邮件超链接。如下图所示:

除了使用上述超链接公式外,您还可以在 Excel 中手动通过“创建超链接”功能轻松生成电子邮件超链接。本节将为您详细演示操作步骤。
1. 右键单击您希望插入超链接的单元格,然后从右键菜单中选择“链接”。

2. 在弹出的“创建超链接”对话框中,按以下方式完成配置。
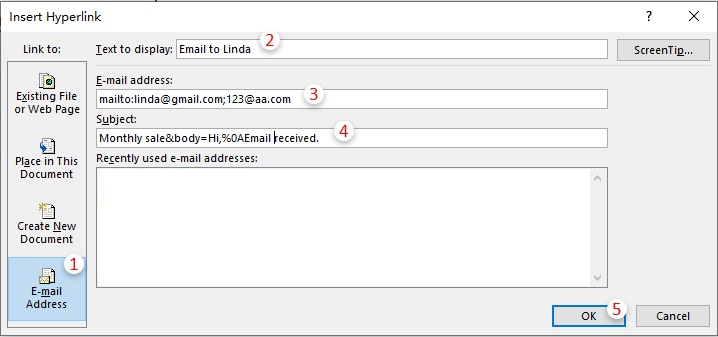
单击该超链接后,系统将自动创建一封 Outlook 邮件,其“收件人”、“主题”和“正文”字段如下图所示。

注意事项:
1.2 使用 VBA 脚本向单元格中的多个收件人发送电子邮件
在上述示例中,您可以看到多个邮箱地址显示在一个单元格中,并以分号分隔。如果您拥有如下图所示的邮箱地址列表,并希望向所有收件人发送一封邮件,或分别发送独立邮件,以下 VBA 代码将为您提供有力支持。

1.2.1 使用 VBA 脚本向单元格中的多个收件人发送一封电子邮件
1. 在包含所有待发送邮件的邮箱地址的工作表中,按下“Alt”+“F11”键,即可打开“Microsoft Visual Basic for Applications”窗口。
2. 在“Microsoft Visual Basic for Applications”窗口中,依次单击“插入”>“模块”,然后将以下代码粘贴到“模块(代码)”窗口中。

VBA 代码:向邮箱地址列表发送电子邮件
Sub sendmultiple()
'updateby Extendoffice 20220802
    Dim xOTApp As Object
    Dim xMItem As Object
    Dim xCell As Range
    Dim xRg As Range
    Dim xEmailAddr As String
    Dim xTxt As String
    On Error Resume Next
    xTxt = ActiveWindow.RangeSelection.Address
    Set xRg = Application.InputBox("Please select the addresses list:", "Kutools for Excel", xTxt, , , , , 8)
    If xRg Is Nothing Then Exit Sub
    Set xOTApp = CreateObject("Outlook.Application")
    For Each xCell In xRg
        If xCell.Value Like "*@*" Then
            If xEmailAddr = "" Then
                xEmailAddr = xCell.Value
            Else
                xEmailAddr = xEmailAddr & ";" & xCell.Value
            End If
        End If
    Next
    Set xMItem = xOTApp.CreateItem(0)
    With xMItem
        .To = xEmailAddr
        .Subject = "Test"
        .Body = "Dear " _
                & vbNewLine & vbNewLine & _
                "This is a test email " & _
                "sending in Excel"
        .Display
    End With
End Sub
3. 按下“F5”键运行代码,随即弹出“Kutools for Excel”对话框;请选择您的邮箱地址列表,然后单击“确定”。

注意事项:
.Body = "Dear " _
        & vbNewLine & vbNewLine & _
        "This is a test email " & _
"sending in Excel"运行代码后,所选区域中的所有邮箱地址将自动显示在邮件窗口的“收件人”字段中。如下图所示:

1.2.2 使用 VBA 脚本分别向单元格中列出的每位收件人发送电子邮件
上述代码会将所选区域中的所有邮箱地址添加到邮件窗口的“收件人”字段中。如果您希望分别向每个单元格中的电子邮件地址单独发送邮件,且确保收件人彼此不可见,可尝试以下 VBA 脚本。
1. 在包含所有待发送邮件的邮箱地址的工作表中,按下“Alt”+“F11”键,即可打开“Microsoft Visual Basic for Applications”窗口。
2. 在“Microsoft Visual Basic for Applications”窗口中,单击“插入”>“模块”,然后将以下代码粘贴到“模块(代码)”窗口中。
VBA 代码:分别向单元格中的每位电子邮件地址列表发送邮件
Sub SendEmailToAddressInCells()
'Updated by Extendoffice 20220802
    Dim xRg As Range
    Dim xRgEach As Range
    Dim xRgVal As String
    Dim xAddress As String
    Dim xOutApp As Outlook.Application
    Dim xMailOut As Outlook.MailItem
    On Error Resume Next
    xAddress = ActiveWindow.RangeSelection.Address
    Set xRg = Application.InputBox("Please select the addresses list", "KuTools For Excel", xAddress, , , , , 8)
    If xRg Is Nothing Then Exit Sub
    Application.ScreenUpdating = False
    Set xOutApp = CreateObject("Outlook.Application")
    Set xRg = xRg.SpecialCells(xlCellTypeConstants, xlTextValues)
    For Each xRgEach In xRg
        xRgVal = xRgEach.Value
        If xRgVal Like "?*@?*.?*" Then
            Set xMailOut = xOutApp.CreateItem(olMailItem)
            With xMailOut
                .To = xRgVal
                .Subject = "Test"
                .Body = "Dear " _
                      & vbNewLine & vbNewLine & _
                        "This is a test email " & _
                        "sending in Excel"
                .Display
                '.Send
            End With
        End If
    Next
    Set xMailOut = Nothing
    Set xOutApp = Nothing
    Application.ScreenUpdating = True
End Sub
3. 然后单击“工具”>“引用”,在弹出的“引用 – VBAProject”对话框中,找到并勾选“Microsoft Outlook 16.0 Object Library”复选框,再单击“确定”按钮保存更改。

4. 按下“F5”键运行代码,随即弹出“Kutools for Excel”对话框;请选择邮箱地址列表,然后单击“确定”。

注意事项:
.Subject = "Test"
.Body = "Dear " _
        & vbNewLine & vbNewLine & _
        "This is a test email " & _
"sending in Excel"本例中,所选区域包含六个邮箱地址,因此将自动打开六个 Outlook 邮件窗口,每个窗口的“收件人”字段中分别填入对应的电子邮件地址,如下图所示。

5. 最后,依次单击“发送”按钮,逐个发送邮件。
2. 在从 Excel 发送的电子邮件中,通过 VBA 脚本添加附件或插入 Outlook 签名
本节将为您展示如何在从 Excel 发送的电子邮件中插入附件或添加 Outlook 默认签名。
2.1 在从 Excel 发送的电子邮件中添加插入附件
此处介绍了插入附件的多种场景,您可以根据实际需求选择合适的方法。在本节中,您将了解以下内容(点击任意链接即可跳转至对应方法):
您可以将以下 VBA 代码应用于从 Excel 中将文件夹内的一个或多个文件作为电子邮件附件发送。
1. 按下“Alt”+“F11”组合键。
2. 在打开的“Microsoft Visual Basic for Applications”窗口中,依次单击“插入”>“模块”,然后将以下 VBA 代码粘贴到“模块(代码)”窗口中。
VBA 代码:从 Excel 中将文件夹中的文件作为附件通过电子邮件发送
Sub EmailWithAttachments()
'Updated by Extendoffice 20220802
    Dim xStrFile As String
    Dim xFilePath As String
    Dim xFileDlg As FileDialog
    Dim xFileDlgItem As Variant
    Dim xOutApp As Outlook.Application
    Dim xMailOut As Outlook.MailItem
    Application.ScreenUpdating = False
    Set xOutApp = CreateObject("Outlook.Application")
    Set xMailOut = xOutApp.CreateItem(olMailItem)
    Set xFileDlg = Application.FileDialog(msoFileDialogFilePicker)
    If xFileDlg.Show = -1 Then
        With xMailOut
            .BodyFormat = olFormatRichText
            .To = "xxx@aaa.com"
            .Subject = "test"
            .HTMLBody = "test"
            For Each xFileDlgItem In xFileDlg.SelectedItems
                .Attachments.Add xFileDlgItem
            Next xFileDlgItem
            .Display
        End With
    End If
    Set xMailOut = Nothing
    Set xOutApp = Nothing
    Application.ScreenUpdating = True
End Sub
注意事项:
3. 随后,单击“工具”>“引用”。在弹出的“引用 – VBAProject”对话框中,找到并勾选“Microsoft Outlook 16.0 对象库”,再单击“确定”按钮保存更改。

4. 按下“F5”键运行代码,随后将弹出“浏览”窗口,请选择您要作为邮件附件添加的文件,然后单击“确定”。

随后将弹出邮件窗口,您可在“附件”字段中看到所选文件已自动添加。

若想将当前工作表从 Excel 中作为附件通过电子邮件发送,可使用本节提供的 VBA 脚本。
1. 按下“Alt”+“F11”组合键。
2. 在打开的“Microsoft Visual Basic for Applications”窗口中,单击“插入” > “模块”,然后将以下 VBA 代码粘贴到“模块(代码)”窗口中。
VBA 代码:将当前工作表作为附件通过电子邮件发送
Sub SendWorkSheet()
'Update by Extendoffice 20220802
Dim xFile As String
Dim xFormat As Long
Dim Wb As Workbook
Dim Wb2 As Workbook
Dim FilePath As String
Dim FileName As String
Dim OutlookApp As Object
Dim OutlookMail As Object
On Error Resume Next
Application.ScreenUpdating = False
Set Wb = Application.ActiveWorkbook
ActiveSheet.Copy
Set Wb2 = Application.ActiveWorkbook
Select Case Wb.FileFormat
Case xlOpenXMLWorkbook:
    xFile = ".xlsx"
    xFormat = xlOpenXMLWorkbook
Case xlOpenXMLWorkbookMacroEnabled:
    If Wb2.HasVBProject Then
        xFile = ".xlsm"
        xFormat = xlOpenXMLWorkbookMacroEnabled
    Else
        xFile = ".xlsx"
        xFormat = xlOpenXMLWorkbook
    End If
Case Excel8:
    xFile = ".xls"
    xFormat = Excel8
Case xlExcel12:
    xFile = ".xlsb"
    xFormat = xlExcel12
End Select
FilePath = Environ$("temp") & "\"
FileName = Wb.Name & Format(Now, "dd-mmm-yy h-mm-ss")
Set OutlookApp = CreateObject("Outlook.Application")
Set OutlookMail = OutlookApp.CreateItem(0)
Wb2.SaveAs FilePath & FileName & xFile, FileFormat:=xFormat
With OutlookMail
    .To = "xxx@aaa.com"
    .CC = "Email Address"
    .BCC = "Email Address"
    .Subject = "kte features"
    .Body = "Please check and read this document."
    .Attachments.Add Wb2.FullName
    .Display
    '.Send
End With
Wb2.Close
Kill FilePath & FileName & xFile
Set OutlookMail = Nothing
Set OutlookApp = Nothing
Application.ScreenUpdating = True
End Sub
注意事项:
3. 按下“F5”键运行代码,当前工作表将立即保存为 Excel 文件,并自动作为附件插入到邮件窗口中。请参见截图:

注意:仅包含当前工作表的附件工作簿将与原始工作簿同名,并在名称中附加代码运行的时间。
在学习了如何使用 VBA 代码将 Excel 中的当前工作表作为附件通过电子邮件发送后,我们再为您提供一段 VBA 脚本,助您轻松将整个工作簿作为附件发送。请按以下步骤操作。
1. 按下“Alt”+“F11”组合键。
2. 在打开的“Microsoft Visual Basic for Applications”窗口中,单击“插入”>“模块”,然后将以下 VBA 代码粘贴到模块(代码)窗口中。
VBA 代码:从 Excel 中将当前工作簿作为附件通过电子邮件发送
Sub SendWorkBook()
'Update by Extendoffice 20220802
Dim OutlookApp As Object
Dim OutlookMail As Object
Set OutlookApp = CreateObject("Outlook.Application")
Set OutlookMail = OutlookApp.CreateItem(0)
On Error Resume Next
With OutlookMail
    .To = "xxx@aaa.com"
    .CC = "Email Address"
    .BCC = "Email Address"
    .Subject = "kte feature"
    .Body = "Hello, please check and read this document, thank you."
    .Attachments.Add Application.ActiveWorkbook.FullName
    .Display
    '.Send
End With
Set OutlookMail = Nothing
Set OutlookApp = Nothing
End Sub
注意事项:
3. 按下“F5”键运行代码,当前工作簿将自动作为附件插入到邮件窗口中。请参见截图:

对大多数人来说,通常会先将 Excel 工作表另存为 PDF 文件,再将其作为附件发送给他人。本节将为您展示一种更高效的方法:直接从 Excel 发送邮件,并自动将当前打开的工作簿以 PDF 附件形式附上,无需手动另存为 PDF 文件。
1. 按下“Alt”+“F11”组合键。
2. 在打开的“Microsoft Visual Basic for Applications”窗口中,单击“插入”>“模块”,然后将以下 VBA 代码粘贴到模块(代码)窗口中。
VBA 代码:将整个工作簿作为 PDF 附件通过电子邮件发送
Sub SendWorkBookAsPDF()
'Update 20220803
Dim Wb As Workbook
Dim FilePath As String
Dim FileName As String
Dim xOutApp As Object
Dim xOutMail As Object
On Error Resume Next

Application.ScreenUpdating = False
Set Wb = Application.ActiveWorkbook
FileName = Left(Wb.Name, (InStrRev(Wb.Name, ".", -1, vbTextCompare) - 1)) & Format(Now, "dd-mmm-yy h-mm-ss") & ".pdf"
FilePath = Environ$("temp") & "\" & FileName

Wb.ExportAsFixedFormat Type:=xlTypePDF, FileName:= _
    FilePath, Quality:=xlQualityStandard, _
    IncludeDocProperties:=True, IgnorePrintAreas:=False, OpenAfterPublish:= _
    False

Set xOutApp = CreateObject("Outlook.Application")
Set xOutMail = xOutApp.CreateItem(0)
With xOutMail
       .To = "xxx@aaa.com"
       .CC = "Email Address"
       .BCC = "Email Address"
       .Subject = "test"
       .Body = "test"
       .Attachments.Add FilePath
       .Display   'or use .Send
   End With
Kill FilePath
Set xOutMail = Nothing
Set xOutApp = Nothing
Application.ScreenUpdating = True
End Sub
注意事项:
3. 按下“F5”键运行代码,当前工作簿将自动以 PDF 文件形式插入到新邮件窗口中作为附件。请参见截图:

例如,您有一个名为“月度销售”的工作簿,已在名为“销售报告”的工作表中完成了一份销售报表,并希望将该工作表以 PDF 文件形式发送给同事。以下 VBA 代码可助您轻松实现这一目标。
1. 按下“Alt”+“F11”组合键。
2. 在打开的“Microsoft Visual Basic for Applications”窗口中,依次单击“插入”>“模块”,然后将以下 VBA 代码粘贴到“模块(代码)”窗口中。
VBA 代码:将当前工作表作为 PDF 附件通过电子邮件发送
Sub SendWorkSheetToPDF()
'Update by Extendoffice 20220803
Dim Wb As Workbook
Dim FileName As String
Dim OutlookApp As Object
Dim OutlookMail As Object
On Error Resume Next
Set Wb = Application.ActiveWorkbook
FileName = Wb.FullName
xIndex = VBA.InStrRev(FileName, ".")
If xIndex > 1 Then FileName = VBA.Left(FileName, xIndex - 1)
FileName = FileName & "_" + ActiveSheet.Name & ".pdf"
ActiveSheet.ExportAsFixedFormat Type:=xlTypePDF, FileName:=FileName
Set OutlookApp = CreateObject("Outlook.Application")
Set OutlookMail = OutlookApp.CreateItem(0)
With OutlookMail
    .To = "xxx@aaa.com"
    .CC = "Email Address"
    .BCC = "Email Address"
    .Subject = "test"
    .Body = "test"
    .Attachments.Add FileName
    .Display
    '.Send
End With
Kill FileName
Set OutlookMail = Nothing
Set OutlookApp = Nothing
End Sub
注意事项:
3. 按下“F5”键运行代码,当前工作表将自动作为 PDF 附件插入到新邮件窗口中。请参见截图:

2.2 在从 Excel 发送的邮件中插入 Outlook 签名
以上述情况为例,您使用上述 VBA 代码从 Excel 将当前工作表作为 PDF 文件附件发送时,可能无法在邮件窗口中自动添加 Outlook 签名。若希望在从 Excel 发送的邮件中保留 Outlook 默认签名,以下方法可为您提供帮助。
下方列出了两段 VBA 代码。
VBA 代码 1:此代码可有效保留 Outlook 签名。
VBA 代码 2:此代码可将当前工作表作为 PDF 附件通过电子邮件发送。
VBA 代码 1:保留 Outlook 签名
.HTMLBody = "Email body" & "
" & .HTMLBody
VBA 代码 2:将当前工作表作为 PDF 附件通过电子邮件发送
Sub SendWorkSheetToPDF()
'Update by Extendoffice 20220803
Dim Wb As Workbook
Dim FileName As String
Dim OutlookApp As Object
Dim OutlookMail As Object
On Error Resume Next
Set Wb = Application.ActiveWorkbook
FileName = Wb.FullName
xIndex = VBA.InStrRev(FileName, ".")
If xIndex > 1 Then FileName = VBA.Left(FileName, xIndex - 1)
FileName = FileName & "_" + ActiveSheet.Name & ".pdf"
ActiveSheet.ExportAsFixedFormat Type:=xlTypePDF, FileName:=FileName
Set OutlookApp = CreateObject("Outlook.Application")
Set OutlookMail = OutlookApp.CreateItem(0)
With OutlookMail
    .To = "xxx@aaa.com"
    .CC = "Email Address"
    .BCC = "Email Address"
    .Subject = "test"
    .Body = "test"
    .Attachments.Add FileName
    .Display
    '.Send
End With
Kill FileName
Set OutlookMail = Nothing
Set OutlookApp = Nothing
End Sub
1. 通常,您只需按下“Alt”+“F11”组合键,即可快速打开“Microsoft Visual Basic for Applications”窗口。
2. 在“Microsoft Visual Basic for Applications”窗口中,单击“插入”>“模块”,然后将上述 VBA 代码 2 粘贴到“模块(代码)”窗口中。
3. 若要在从 Excel 发送的邮件中保留 Outlook 默认签名,请按以下方式修改 VBA 代码 2:

以下是修改后的完整代码。
Sub SendWorkSheetToPDF()
'Update by Extendoffice 20220803
Dim Wb As Workbook
Dim FileName As String
Dim OutlookApp As Object
Dim OutlookMail As Object
On Error Resume Next
Set Wb = Application.ActiveWorkbook
FileName = Wb.FullName
xIndex = VBA.InStrRev(FileName, ".")
If xIndex > 1 Then FileName = VBA.Left(FileName, xIndex - 1)
FileName = FileName & "_" + ActiveSheet.Name & ".pdf"
ActiveSheet.ExportAsFixedFormat Type:=xlTypePDF, FileName:=FileName
Set OutlookApp = CreateObject("Outlook.Application")
Set OutlookMail = OutlookApp.CreateItem(0)
With OutlookMail
    .Display
    .To = "xxx@aaa.com"
    .CC = "Email Address"
    .BCC = "Email Address"
    .Subject = "test"
    .HTMLBody = "Email body" & "
" & .HTMLBody
    .Attachments.Add FileName
    '.Send
End With
Kill FileName
Set OutlookMail = Nothing
Set OutlookApp = Nothing
End Sub
4. 按下“F5”键运行代码,随后将弹出一个新邮件窗口,当前工作表已作为 PDF 文件附件自动添加,且 Outlook 默认签名会插入到邮件正文末尾。

3. 当满足特定条件时,自动通过 Excel 发送邮件(使用 VBA 脚本)
在上述示例中,您需要手动运行代码才能发送邮件。但如果您希望在满足特定条件时(例如单元格达到某个值、单元格值发生变化或到达指定日期等)自动触发代码,邮件即可自动发送。本节列出了 Excel 用户在 Google 中经常搜索的触发条件,助您轻松实现“条件满足即自动从 Excel 发送邮件”的功能。
3.1 当单元格达到特定值时自动发送邮件
如下图所示,假设您有一个销售表格,其中 D6 单元格包含销售总额。当销售总额超过 10,000 时,系统将自动向老板发送邮件;若销售总额小于或等于 10,000,则不执行任何操作。

1. 在包含销售表格的工作表标签上右键单击,然后从快捷菜单中选择“查看代码”。

2. 在打开的“Microsoft Visual Basic for Applications”窗口中,请将以下 VBA 代码粘贴到“工作表(代码)”窗口内。

VBA 代码:在 Excel 中当单元格达到特定值时自动发送邮件
Dim xRg As Range
'Update by Extendoffice 20200803
Private Sub Worksheet_Change(ByVal Target As Range)
On Error Resume Next
If Target.Cells.Count > 1 Then Exit Sub
Set xRg = Intersect(Range("D6"), Target)
If xRg Is Nothing Then Exit Sub
If IsNumeric(Target.Value) And Target.Value > 10000 Then
Call Mail_small_Text_Outlook
End If
End Sub
Sub Mail_small_Text_Outlook()
Dim xOutApp As Object
Dim xOutMail As Object
Dim xMailBody As String
Set xOutApp = CreateObject("Outlook.Application")
Set xOutMail = xOutApp.CreateItem(0)
xMailBody = "Hi boss" & vbNewLine & vbNewLine & _
"Total sales of over $10,000 in January: " & Range("D6")
On Error Resume Next
With xOutMail
.To = "xxx@aaa.com"
.CC = "Email address"
.BCC = "Email address"
.Subject = "test"
.Body = xMailBody
.Display 'or use .Send
End With
On Error GoTo 0
Set xOutMail = Nothing
Set xOutApp = Nothing
End Sub

Private Sub Worksheet_Calculate()
Dim xI As Integer
Dim xRg As Range
Set xRg = Range("D6")
On Error GoTo Err01
xI = Int(xRg.Value)
If xI > 10000 Then
Call Mail_small_Text_Outlook
End If
Err01:
End Sub
注意事项:
xMailBody = "Hi boss" & vbNewLine & vbNewLine & _
"Total sales of over $10,000 in January: " & Range("D6")从现在起,当 D6 单元格中的值超过 10,000 时,系统将自动创建如下图所示的邮件。

3.2 当单元格值发生变化时自动发送邮件
如下图所示,假设您收到一个工作簿,其中包含不同工作表中的月度销售数据及对应的销售总额。您需要核对销售总额;若发现该总额已被修改,请将工作簿退回给发件人,并通知对方相关单元格内容已发生更改。

1. 在包含销售表的工作表中,右键单击工作表标签,然后从快捷菜单中选择“查看代码”。

2. 在打开的“Microsoft Visual Basic for Applications”窗口中,请将以下 VBA 代码粘贴到“工作表(代码)”窗口内。
VBA 代码:当指定单元格值发生变化时自动发送邮件
Private Sub Worksheet_Change(ByVal Target As Range)
'Updated by Extendoffice 20220803
Dim xRgSel As Range
Dim xOutApp As Object
Dim xMailItem As Object
Dim xMailBody As String
Dim xBoolean As Boolean
Dim xItsRG As Range
Dim xDDs As Range
Dim xDs As Range
On Error Resume Next
Application.ScreenUpdating = False
Application.DisplayAlerts = False
xBoolean = False
Set xRg = Range("B14")

Set xItsRG = Intersect(Target, xRg)
Set xDDs = Intersect(Target.DirectDependents, xRg)
Set xDs = Intersect(Target.Dependents, xRg)
If Not (xItsRG Is Nothing) Then
Set xRgSel = xItsRG
xBoolean = True
ElseIf Not (xDDs Is Nothing) Then
Set xRgSel = xDDs
xBoolean = True
ElseIf Not (xDs Is Nothing) Then
Set xRgSel = xDs
xBoolean = True
End If

ActiveWorkbook.Save
If xBoolean Then
Debug.Print xRgSel.Address

Set xOutApp = CreateObject("Outlook.Application")
Set xMailItem = xOutApp.CreateItem(0)
xMailBody = "The cell " & xRgSel.Address(False, False) & _
" in the worksheet '" & Me.Name & "' were modified on " & _
Format$(Now, "mm/dd/yyyy") & " at " & Format$(Now, "hh:mm:ss") & _
" by " & Environ$("username") & "."

With xMailItem
.To = "xxx@aaa.com"
.CC = "Email address"
.BCC = "Email address"
.Subject = "Worksheet modified"
.Body = xMailBody
.Attachments.Add (ThisWorkbook.FullName)
.Display
End With
Set xRgSel = Nothing
Set xOutApp = Nothing
Set xMailItem = Nothing
End If
Application.DisplayAlerts = True
Application.ScreenUpdating = True
End Sub
注意:在代码中,
从现在起,只要 B14 单元格中的值发生变化,系统将自动创建如下图所示的 Outlook 邮件。

3.3 当工作簿保存时自动发送邮件
如果您有一个修改后需要与他人共享的工作簿,通常需手动保存工作簿、启动邮件客户端、新建一封附带该工作簿的邮件、填写相应字段,再发送出去。本节将为您介绍一种方法,可在每次保存工作簿时自动创建邮件。请按以下步骤操作。
1. 按下“Alt”+“F11”组合键,即可打开“Microsoft Visual Basic for Applications”窗口。
2. 在此窗口中,于“工程”窗格内双击“ThisWorkbook”,随后将以下 VBA 代码粘贴至“ThisWorkbook(代码)”窗口中。

VBA 代码:当工作簿保存时自动发送邮件
Private Sub Workbook_AfterSave(ByVal Success As Boolean)
'Updated by Extendoffice 20220804
    Dim xOutApp As Object
    Dim xMailItem As Object
    Dim xName As String
    On Error Resume Next
    Set xOutApp = CreateObject("Outlook.Application")
    Set xMailItem = xOutApp.CreateItem(0)
    xName = ActiveWorkbook.FullName
    With xMailItem
        .To = "xxx@aaa.com"
        .CC = "Email address"
        .BCC = "Email address"
        .Subject = "The workbook has been updated"
        .Body = "Hi," & Chr(13) & Chr(13) & "File is now updated."
        .Attachments.Add xName
        .Display
       '.send
    End With
    Set xMailItem = Nothing
    Set xOutApp = Nothing
End Sub
注意:在代码中,
3. 从现在起,每当您按下“Ctrl”+“S”键或单击“保存”按钮保存工作簿时,系统将自动创建一封 Outlook 邮件——当前工作簿会作为附件自动添加,各字段也已按指定内容填充完毕。请参见截图:

提示:如果您经常使用此工作簿,建议将其另存为“Excel 启用宏的工作簿”,以便保留 VBA 脚本,供日后继续使用。具体步骤如下。

3.4 在特定时间自动发送邮件
假设您希望每周五上午 9 点自动向某人发送一封包含任务分配工作簿的电子邮件,并在 Excel 中全自动完成此操作,无需手动干预邮件客户端。本节将为您展示实现这一功能的方法。
1. 按下“Alt”+“F11”组合键,即可打开“Microsoft Visual Basic for Applications”窗口。
2. 在“Microsoft Visual Basic for Applications”窗口中,单击“插入”>“模块”,然后将以下 VBA 代码粘贴到模块窗口中。

VBA 代码 1:从 Excel 以附件形式发送当前工作簿
Sub Timer()
    If Weekday(Date) = vbFriday Then
        SendWorkBook
        Application.OnTime TimeValue("09:00:00"), "Timer"
    Else
        Application.OnTime TimeValue("09:00:00"), "Timer"
    End If
End Sub

Sub SendWorkBook()
'Update by Extendoffice 20220802
Dim OutlookApp As Object
Dim OutlookMail As Object
Set OutlookApp = CreateObject("Outlook.Application")
Set OutlookMail = OutlookApp.CreateItem(0)
On Error Resume Next
With OutlookMail
    .To = "xxx@aaa.com"
    .CC = "Email Address"
    .BCC = "Email Address"
    .Subject = "kte feature"
    .Body = "Hello, please check and read this document, thank you."
    .Attachments.Add Application.ActiveWorkbook.FullName
    .Display
    '.Send
End With
Set OutlookMail = Nothing
Set OutlookApp = Nothing
End Sub
3. 在此窗口中,于“工程”窗格内双击“ThisWorkbook”,随后将以下 VBA 代码粘贴至“ThisWorkbook (代码)”窗口中。

VBA 代码 2:在指定时间自动发送电子邮件
Private Sub Workbook_Open()
    Application.OnTime TimeValue("09:00:00"), "Timer"
End Sub
注意事项:
4. 保存代码,然后将工作簿另存为启用宏的 Excel 工作簿。
5. 打开您保存的启用宏的工作簿,系统将在到达指定日期和时间时自动创建或发送电子邮件。
4. 其他相关主题
本节汇总了您在从 Excel 发送电子邮件时可能遇到的其他相关主题。
4.1 从 Excel 发送单元格区域(使用 VBA 脚本)
假设 Excel 工作表中有一个如下图所示的月度销售表,您需要将该表格作为电子邮件正文内容或直接以附件形式发送给他人。为此,我们为您提供两种实现方法。

4.1.1 从 Excel 将单元格区域作为电子邮件正文的一部分发送
您可以运行以下 VBA 代码,将 Excel 中的单元格区域直接作为电子邮件正文的一部分发送。
1. 按下“Alt”+“F11”组合键,即可打开“Microsoft Visual Basic for Applications”窗口。
2. 在“Microsoft Visual Basic for Applications”窗口中,单击“工具”>“引用”,然后在弹出的“引用–VBAProject”对话框中勾选“Microsoft Outlook 16.0 Object Library”复选框,最后单击“确定”。

3. 单击“插入”>“模块”,然后将以下 VBA 代码粘贴到“模块(代码)”窗口中。
VBA 代码:从 Excel 将单元格区域作为电子邮件正文的一部分发送
Sub SendARangeofCells()
'Updated by Extendoffice 20220809
    Dim xRg As Range
    Dim I, J As Long
    Dim xAddress As String
    Dim xMailOut As Object
    Dim xOutApp As Object
    On Error Resume Next
    Set xOutApp = CreateObject("Outlook.Application")
    Set xMailOut = xOutApp.CreateItem(olMailItem)
    xAddress = ActiveWindow.RangeSelection.Address
    Set xRg = Application.InputBox("Please select range you need to paste into email body", "KuTools For Excel", xAddress, , , , , 8)
If xRg Is Nothing Then Exit Sub
Application.ScreenUpdating = False
    Set xOutApp = CreateObject("Outlook.Application")
    Set xMailOut = xOutApp.CreateItem(olMailItem)
    With xMailOut
        .Subject = "test"
        .To = "xxx@aaa.com"
        .CC = "Email address"
        .BCC = "Email address"
        .HTMLBody = RangetoHTML(xRg)
        .Display
        '.Send
    End With
    Set xMailOut = Nothing
    Set xOutApp = Nothing
    Application.ScreenUpdating = True
End Sub

 ' The following VBA script is cited from this page:
 ' https://stackoverflow.com/questions/18663127/paste-excel-range-in-outlook
Function RangetoHTML(rng As Range)
' By Ron de Bruin.
    Dim fso As Object
    Dim ts As Object
    Dim TempFile As String
    Dim TempWB As Workbook

    TempFile = Environ$("temp") & "/" & Format(Now, "dd-mm-yy h-mm-ss") & ".htm"

    'Copy the range and create a new workbook to past the data in
    rng.Copy
    Set TempWB = Workbooks.Add(1)
    With TempWB.Sheets(1)
        .Cells(1).PasteSpecial Paste:=8
        .Cells(1).PasteSpecial xlPasteValues, , False, False
        .Cells(1).PasteSpecial xlPasteFormats, , False, False
        .Cells(1).Select
        Application.CutCopyMode = False
        On Error Resume Next
        .DrawingObjects.Visible = True
        .DrawingObjects.Delete
        On Error GoTo 0
    End With

    'Publish the sheet to a htm file
    With TempWB.PublishObjects.Add( _
         SourceType:=xlSourceRange, _
         Filename:=TempFile, _
         Sheet:=TempWB.Sheets(1).Name, _
         Source:=TempWB.Sheets(1).UsedRange.Address, _
         HtmlType:=xlHtmlStatic)
        .Publish (True)
    End With

    'Read all data from the htm file into RangetoHTML
    Set fso = CreateObject("Scripting.FileSystemObject")
    Set ts = fso.GetFile(TempFile).OpenAsTextStream(1, -2)
    RangetoHTML = ts.ReadAll
    ts.Close
    RangetoHTML = Replace(RangetoHTML, "align=center x:publishsource=", _
                          "align=left x:publishsource=")

    'Close TempWB
    TempWB.Close savechanges:=False

    'Delete the htm file we used in this function
    Kill TempFile

    Set ts = Nothing
    Set fso = Nothing
    Set TempWB = Nothing
End Function
注意:在代码中,
4. 按下“F5”键运行代码。在弹出的“Kutools for Excel”对话框中,选择您要作为电子邮件正文内容发送的单元格区域,然后单击“确定”。参见截图:

随后将自动创建一封 Outlook 电子邮件,您在工作表中选定的区域会自动插入到邮件正文中。参见截图:

如果您希望将 Excel 工作表中的特定单元格区域作为附件通过电子邮件发送,不妨试试以下 VBA 代码。
1. 按下“Alt”+“F11”组合键。
2. 在打开的“Microsoft Visual Basic for Applications”窗口中,依次单击“插入”>“模块”,然后将以下 VBA 代码粘贴到“模块(代码)”窗口中。
VBA 代码:从 Excel 将单元格区域作为附件发送
Sub SendRange()
'Update 20220809
Dim xFile As String
Dim xFormat As Long
Dim Wb As Workbook
Dim Wb2 As Workbook
Dim Ws As Worksheet
Dim FilePath As String
Dim FileName As String
Dim OutlookApp As Object
Dim OutlookMail As Object
Dim WorkRng As Range
xTitleId = "KutoolsforExcel"
Set WorkRng = Application.Selection
Set WorkRng = Application.InputBox("Range", xTitleId, WorkRng.Address, Type:=8)
Application.ScreenUpdating = False
Application.DisplayAlerts = False
Set Wb = Application.ActiveWorkbook
Wb.Worksheets.Add
Set Ws = Application.ActiveSheet
WorkRng.Copy Ws.Cells(1, 1)
Ws.Copy
Set Wb2 = Application.ActiveWorkbook
Select Case Wb.FileFormat
Case xlOpenXMLWorkbook:
    xFile = ".xlsx"
    xFormat = xlOpenXMLWorkbook
Case xlOpenXMLWorkbookMacroEnabled:
    If Wb2.HasVBProject Then
        xFile = ".xlsm"
        xFormat = xlOpenXMLWorkbookMacroEnabled
    Else
        xFile = ".xlsx"
        xFormat = xlOpenXMLWorkbook
    End If
Case Excel8:
    xFile = ".xls"
    xFormat = Excel8
Case xlExcel12:
    xFile = ".xlsb"
    xFormat = xlExcel12
End Select
FilePath = Environ$("temp") & "\"
FileName = Wb.Name & Format(Now, "dd-mmm-yy h-mm-ss")
Set OutlookApp = CreateObject("Outlook.Application")
Set OutlookMail = OutlookApp.CreateItem(0)
Wb2.SaveAs FilePath & FileName & xFile, FileFormat:=xFormat
With OutlookMail
    .To = "xxx@aaa.com"
    .CC = "Email address"
    .BCC = "Email address"
    .Subject = "Monthly sales for 2021"
    .Body = "Hello, please check and read this document. "
    .Attachments.Add Wb2.FullName
    .Display
    '.Send
End With
Wb2.Close
Kill FilePath & FileName & xFile
Set OutlookMail = Nothing
Set OutlookApp = Nothing
Ws.Delete
Application.DisplayAlerts = True
Application.ScreenUpdating = True
End Sub
注意事项:
3. 按下“F5”键运行代码。在弹出的“Kutools for Excel”对话框中,选择您要作为电子邮件附件发送的单元格区域,然后单击“确定”。参见截图:

随后,系统将自动创建一封 Outlook 电子邮件,并将您在工作表中选定的单元格区域保存为 Excel 工作表,作为附件添加到邮件窗口中。参见截图:

4.2 在 Excel 中单击按钮时发送电子邮件
如果您希望通过单击命令按钮触发宏,从 Excel 发送电子邮件(例如,将当前工作簿作为附件发送给他人),请按以下步骤操作。
1. 单击“开发工具”>“插入”>“命令按钮(ActiveX 控件)”,然后在工作表中绘制一个命令按钮。
提示:若您已创建命令按钮,请直接跳过此步骤。

2. 按下“Alt”+“F11”组合键,打开“Microsoft Visual Basic for Applications”窗口;随后,单击“插入”>“模块”,并将用于以附件形式从 Excel 发送当前工作簿的 VBA 代码粘贴到模块(代码)窗口中。

注意:此处您在步骤 2 中创建的宏名称为“SendWorkbook”。
3. 按下“Alt”+“Q”组合键,即可关闭“Microsoft Visual Basic for Applications”窗口。
4. 现在,您需要将宏分配给命令按钮。右键单击该按钮,然后从快捷菜单中选择“查看代码”。

5. 随后将弹出“Microsoft Visual Basic for Applications”窗口,您可在“工作表(代码)”窗口中看到以下两行代码。
Private Sub CommandButton1_Click()
End Sub
6. 在命令按钮的子过程中输入现有宏的名称。

7. 按下“Alt”+“Q”键关闭“Visual Basic 编辑器”,然后单击“开发工具”>“设计模式”以退出设计模式。

现在,只需单击命令按钮,即可发送一封附带当前工作簿的电子邮件。
4.3 从指定的电子邮件帐户发送电子邮件
通常,使用 VBA 代码从 Excel 启动电子邮件时,发件人账户默认为 Outlook 中的默认电子邮件账户。如果您已在 Outlook 中配置了多个电子邮件账户,并希望从 Excel 发送邮件时指定使用某一特定账户(而非默认账户),以下 VBA 代码可助您实现这一需求。
在此情况下,必须使用以下代码。
VBA 代码 1:
Dim OutlookMail As Outlook.MailItemVBA 代码 2:
For Each xAccount In OutlookApp.Session.Accounts
  If VBA.LCase(xAccount.SmtpAddress) = VBA.LCase("zxm@addin99.com") Then 'Specify your email account here
    OutlookMail.SendUsingAccount = xAccount
  End If
Next
如何使用上述 VBA 代码?
在本例中,我们将指定一个电子邮件账户,从 Excel 中将当前工作簿作为附件发送。请按以下步骤操作:
1. 按下“Alt”+“F11”键,在弹出的“Microsoft Visual Basic for Applications”窗口中,依次单击“工具”>“引用”。随后,在“引用–VBAProject”对话框中勾选“Microsoft Outlook 16.0 Object Library”复选框,最后单击“确定”。
2. 单击“插入”>“模块”,然后将以下 VBA 代码粘贴到“模块(代码)”窗口中。
VBA 代码:通过指定的 Outlook 账户从 Excel 以附件形式发送当前工作簿
Sub SendWorkBook()
'Update by Extendoffice 20220809
Dim OutlookApp As Object
Dim OutlookMail As Outlook.MailItem 'important! Here can’t be declared as Object
Dim xAccount As Account
Set OutlookApp = CreateObject("Outlook.Application")
Set OutlookMail = OutlookApp.CreateItem(olMailItem)
On Error Resume Next
'The following lines helps to specify a certian email account
For Each xAccount In OutlookApp.Session.Accounts
  If VBA.LCase(xAccount.SmtpAddress) = VBA.LCase("zxm@addin99.com") Then 'Specify your email account here
    OutlookMail.SendUsingAccount = xAccount
  End If
Next
'End
With OutlookMail
    .To = "xxx@aaa.com"
    .CC = "Email Address"
    .BCC = "Email Address"
    .Subject = "kte feature"
    .Body = "Hello, please check and read this document, thank you."
    .Attachments.Add Application.ActiveWorkbook.FullName
    .Display
    '.Send
End With
Set OutlookMail = Nothing
Set OutlookApp = Nothing
End Sub
3. 按下“F5”键运行代码,随后将弹出一封 Outlook 电子邮件,其中“发件人”字段已自动填充为您在代码中指定的电子邮件账户。
4.4 在到达指定日期时发送电子邮件
如果您需要根据特定截止日期自动发送电子邮件,例如下图所示的项目表:当 E2:E7 范围内的截止日期距离今天(假设当前日期为 2022/8/4)小于或等于 7 天时,系统将自动向对应的项目负责人发送邮件,提醒其项目即将到期。

1. 在包含项目表的工作表中,右键单击工作表标签,然后从快捷菜单中选择“查看代码”。

2. 在打开的“Microsoft Visual Basic for Applications”窗口中,将以下 VBA 代码粘贴到“Sheet (Code)”窗口内。
VBA 代码:当满足截止日期时自动发送电子邮件
Public Sub SendMailDueDate()
'Updated by Extendoffice 20220804
Dim xRgDate As Range
Dim xRgSend As Range
Dim xRgText As Range
Dim xRgDone As Range
Dim xOutApp As Object
Dim xMailItem As Object
Dim xLastRow As Long
Dim vbCrLf As String
Dim xMailBody As String
Dim xRgDateVal As String
Dim xRgSendVal As String
Dim xMailSubject As String
Dim i As Long
On Error Resume Next
Set xRgDate = Range("E2:E7") 'Please reference the due date column range
If xRgDate Is Nothing Then Exit Sub
Set xRgSend = Range("C2:C7") 'Please reference the email addresses column range
If xRgSend Is Nothing Then Exit Sub
Set xRgText = Range("D2:D7") 'Please reference the remark column range (the remark used to notify project leaders of the expiration of the project)
If xRgText Is Nothing Then Exit Sub
xLastRow = xRgDate.Rows.Count
Set xRgDate = xRgDate(1)
Set xRgSend = xRgSend(1)
Set xRgText = xRgText(1)
Set xOutApp = CreateObject("Outlook.Application")
For i = 1 To xLastRow
xRgDateVal = ""
xRgDateVal = xRgDate.Offset(i - 1).Value
If xRgDateVal <> "" Then
If CDate(xRgDateVal) - Date <= 7 And CDate(xRgDateVal) - Date > 0 Then
xRgSendVal = xRgSend.Offset(i - 1).Value
xMailSubject = xRgText.Offset(i - 1).Value & " on " & xRgDateVal
vbCrLf = "

"
            xMailBody = ""
            xMailBody = xMailBody & "Dear " & xRgSendVal & vbCrLf
            xMailBody = xMailBody & "Remark : " & xRgText.Offset(i - 1).Value & vbCrLf
            xMailBody = xMailBody & ""
Set xMailItem = xOutApp.CreateItem(0)
With xMailItem
.Subject = xMailSubject
.To = xRgSendVal
.CC = "Email address"
.BCC = "Email address"
.HTMLBody = xMailBody
.Display
'.Send
End With
Set xMailItem = Nothing
End If
End If
Next
Set xOutApp = Nothing
End Sub
注意:在代码中,
3. 按下“F5”键运行代码。若到期日期符合设定条件,系统将自动创建相应的电子邮件。在本示例中,将生成两封电子邮件,如下图所示。

5. 一款助您轻松从 Excel 发送电子邮件的实用工具
如果您是 VBA 新手,上述方法可能不太容易操作。在此,我们推荐使用 Kutools for Excel 的发送电子邮件只需轻点几下,即可轻松从 Excel 发送电子邮件。请按以下步骤操作:
5.1 轻松创建包含所需邮件字段的邮件列表
在使用“发送电子邮件”功能前,您需先创建一个包含所需邮件字段的邮件列表,本处的创建邮件列表功能可助您轻松完成。
1. 单击“KUTOOLS PLUS”>“创建邮件列表”。

2. 在打开的“创建邮件列表”窗口中,您需要按如下方式进行配置。

随后将创建一个示例邮件列表表格,如下方截图所示。

3. 现在,请用您自己的字段数据替换示例中的原始数据。

现在您已创建了一个邮件列表表格。请继续应用“发送电子邮件”功能,根据您创建的字段从 Excel 发送电子邮件。
Kutools for Excel——通过 300 多款必备工具全面增强 Excel 功能,助您工作更快速、更轻松,并借助 AI 功能实现更智能的数据处理与高效办公!立即获取
5.2 轻松发送包含您在邮件列表中创建字段的电子邮件
创建完包含邮件所需字段的邮件列表后(单击此处了解操作方法),即可从 Excel 发送包含这些字段的电子邮件。
1. 选中整个邮件列表,单击“KUTOOLS PLUS”>“发送电子邮件”。

2. 在“发送电子邮件”对话框中,请进行以下配置。

3. 随后将弹出“Kutools for Excel”对话框,提示您已成功发送的邮件数量,单击“确定”即可关闭该对话框。
提示:您可前往 Outlook 的“已发送邮件”文件夹,轻松查看已发送的邮件。

5.3 轻松发送含 HTML 正文的电子邮件(包括超链接、图片等)
此“发送电子邮件”功能允许您创建包含超链接、图片、不同字体大小和字体颜色等内容的 HTML 邮件。
创建完包含所需邮件字段的邮件列表后,在配置“发送电子邮件”对话框时,您即可使用工具栏中的选项丰富正文内容。
请参见下方截图:

5.4 发送邮件时轻松插入 Outlook 默认签名
在上述方法中,我们展示了一段 VBA 代码,助您在发送邮件时自动附带 Outlook 默认签名。而借助“发送电子邮件”功能,只需勾选一个选项,即可在从 Excel 发送的邮件中轻松插入 Outlook 默认签名。
创建完包含所需邮件字段的邮件列表后,在配置“发送电子邮件”对话框时,请单击“选项”>“使用 Outlook 的签名设置”。
注意:请确保“使用 Outlook 的签名设置”选项前已勾选复选标记。

收件人收到邮件后,将在邮件正文末尾看到 Outlook 默认签名。
5.5 轻松从指定的电子邮件帐户发送电子邮件
若要使用特定的电子邮件账户(而非默认账户)从 Excel 发送邮件,“发送电子邮件”功能也能轻松实现。
创建好包含所需邮件字段的邮件列表后,在配置“发送电子邮件”对话框时,请依次单击“选项”>“发送自”,然后选择您要用于发送邮件的电子邮件账户。
注意:选择电子邮件账户后,其前方将显示一个复选标记。

Kutools for Excel——通过 300 多款必备工具全面增强 Excel 功能,助您工作更快速、更轻松,并借助 AI 功能实现更智能的数据处理与高效办公!立即获取
总之,从 Excel 发送邮件在日常工作中非常实用。本文涵盖了从 Excel 发送邮件的更多全面主题,如果您有其他相关话题或更简便的解决方案,欢迎留言告知。
最佳办公效率工具
| 🤖 | KUTOOLS AI 助手:基于以下内容革新数据分析:智能执行 | 生成代码| 创建自定义公式 | 数据分析及生成图表| 调用 Kutools Functions…… |
| 热门功能:查找、高亮或标记重复项 | 删除空白行 | 合并列或单元格且不丢失数据 | 不使用公式的四舍五入…… | |
| 高级 LOOKUP:多条件 VLookup | 多值 VLookup | 跨多工作表 VLookup | 模糊查找…… | |
| 高级下拉列表:快速创建下拉列表 | 级联下拉列表 | 多选下拉列表…… | |
| 列管理器:添加指定数量的列|移动列|切换隐藏列的可见性状态|比较区域与列…… | |
| 特色功能:网格聚焦 | 设计视图 |增强编辑栏 | 工作簿和表管理器 | 资源库(自动文本)| 日期提取 | 汇总工作表 | 加密/解密单元格 | 按列表发送邮件 | 超级筛选 | 特殊筛选(筛选粗体单元格/斜体/删除线……) ...... | |
| 精选 15 工具集:12 文本工具(添加文本,删除特定字符,……)| 50+ 图表 类型(甘特图,……)| 40+ 实用公式(基于生日计算年龄,……)| 19 插入工具(插入二维码,从路径插入图片,……)| 12 转换工具(小写金额转大写,汇率转换,……)| 7 合并和拆分工具(高级合并行,分割单元格,……)|……更多 |
使用 Kutools for Excel 大幅提升您的 Excel 技能,体验前所未有的高效。Kutools for Excel 提供 300 多项高级功能,助您提升生产力、节省时间。立即点击此处,获取您最需要的功能……
Office Tab 为 Office 带来标签式界面,让您的工作更轻松
- 在 Word、Excel、PowerPoint、Publisher、Access、Visio 和 Project 中启用标签式编辑和阅读。
- 在同一个窗口的新标签页中打开并创建多个文档,而非在新窗口中。
- 将您的工作效率提升 50%,每天减少数百次鼠标点击!
所有 Kutools 插件,一个安装程序
Kutools for Office 套件捆绑了适用于 Excel、Word、Outlook 和 PowerPoint 的插件以及 Office Tab Pro,非常适合需要跨多个 Office 应用高效协作的团队。
- 一体化套件— Excel、Word、Outlook 和 PowerPoint 插件 + Office Tab Pro
- 一个安装程序,一个许可证— 几分钟内完成设置(支持 MSI)
- 协同效果更佳— 在多个 Office 应用中实现高效协同
- 30 天全功能试用— 无需注册,无需信用卡
- 超值之选— 比单独购买插件更省钱