跳到主要内容

如何通过Excel中的“命令按钮”自动插入空白新行?

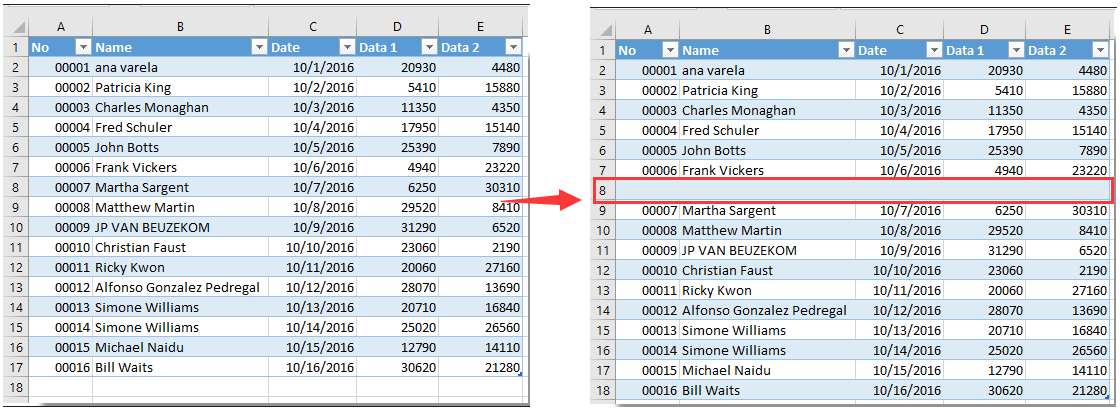
在许多情况下,您可能需要在工作表的指定位置插入一个空白的新行。 在本文中,我们将向您展示如何通过在Excel中单击命令按钮来自动插入空白新行。

通过命令按钮自动插入空白新行


通过命令按钮自动插入空白新行

您可以通过单击命令按钮来运行以下VBA代码以插入空白的新行。 请执行以下操作。

1.首先,您需要插入一个命令按钮。 请点击 开发商 > 插页 > 命令按钮(ActiveX控件)。 看截图:

2.然后在需要添加新行的工作表中绘制一个“命令按钮”,右键单击“命令按钮”并单击 查看房源 从右键单击菜单中。

3.在 查看房源 对话框中,将命令按钮的显示文本输入到 标题 下框 分类 选项卡,然后关闭对话框。

您可以看到命令按钮的显示文本已更改,如下图所示。

4.再次右键单击“命令按钮”,然后单击“确定”。 查看代码 从右键单击菜单中。

5.然后 Microsoft Visual Basic应用程序 窗口,请将原始代码替换为下面的VBA代码 代码 窗口。

VBA代码:通过命令按钮自动插入空白新行

Private Sub CommandButton1_Click()
    Dim rowNum As Integer
    On Error Resume Next
    rowNum = Application.InputBox(Prompt:="Enter Row Number where you want to add a row:", _
                                    Title:="Kutools for excel", Type:=1)
    Rows(rowNum & ":" & rowNum).Insert Shift:=xlDown
End Sub

备注:在代码中,CommanButton1是您创建的命令按钮的名称。

6。 按 其他 + Q 同时关闭按键 Microsoft Visual Basic应用程序 窗口。 然后关闭 设计模式 在下面 开发商 标签。

7.单击插入的命令按钮,然后单击 Kutools for Excel 对话框弹出。 请输入要在其中添加空白新行的特定行号,然后单击 OK 按钮。 看截图:

然后,将空白的新行插入到工作表的指定位置,如下图所示。 并且它保持上述单元格的单元格格式。


相关文章:

最佳办公生产力工具

🤖 Kutools 人工智能助手:基于以下内容彻底改变数据分析: 智能执行   |  生成代码  |  创建自定义公式  |  分析数据并生成图表  |  调用 Kutools 函数...
热门特色: 查找、突出显示或识别重复项   |  删除空白行   |  合并列或单元格而不丢失数据   |   不使用公式进行四舍五入 ...
超级查询: 多条件VLookup    多值VLookup  |   跨多个工作表的 VLookup   |   模糊查询 ....
高级下拉列表: 快速创建下拉列表   |  依赖下拉列表   |  多选下拉列表 ....
列管理器: 添加特定数量的列  |  移动列  |  切换隐藏列的可见性状态  |  比较范围和列 ...
特色功能: 网格焦点   |  设计图   |   大方程式酒吧    工作簿和工作表管理器   |  资源库 (自动文本)   |  日期选择器   |  合并工作表   |  加密/解密单元格    按列表发送电子邮件   |  超级筛选   |   特殊过滤器 (过滤粗体/斜体/删除线...)...
前 15 个工具集12 文本 工具 (添加文本, 删除字符,...)   |   50+ 图表 类型 (甘特图,...)   |   40+ 实用 公式 (根据生日计算年龄,...)   |   19 插入 工具 (插入二维码, 从路径插入图片,...)   |   12 转化 工具 (小写金额转大写, 货币兑换,...)   |   7 合并与拆分 工具 (高级组合行, 分裂细胞,...)   |   ... 和更多

使用 Kutools for Excel 增强您的 Excel 技能,体验前所未有的效率。 Kutools for Excel 提供了 300 多种高级功能来提高生产力并节省时间。  单击此处获取您最需要的功能...

产品描述


Office Tab 为 Office 带来选项卡式界面,让您的工作更加轻松

  • 在Word,Excel,PowerPoint中启用选项卡式编辑和阅读,发布者,Access,Visio和Project。
  • 在同一窗口的新选项卡中而不是在新窗口中打开并创建多个文档。
  • 每天将您的工作效率提高50%,并减少数百次鼠标单击!
Comments (26)
No ratings yet. Be the first to rate!
This comment was minimized by the moderator on the site
Bedankt voor je uitleg. Ik heb de formule toegepast maar bekom dat ik maar 1 lijn kan toevoegen. Daarna laat de knop het niet meer toe en moet ik eerst mijn toegevoegde rij verwijderen. Is er een manier om dit aan te passen?
This comment was minimized by the moderator on the site
Is there a way to make to row inset always below the last entry?
This comment was minimized by the moderator on the site
How do I do the opposite of this and create a button that will delete a row?
This comment was minimized by the moderator on the site
Hi Big Ant,

Here's the modified code to delete a specified row when the Command Button is clicked:


Private Sub CommandButton1_Click()
'Updated by Extendoffice 20230817
    Dim rowNum As Integer
    On Error Resume Next
    rowNum = Application.InputBox(Prompt:="Enter Row Number which you want to delete:", _
                                    Title:="Kutools for excel", Type:=1)
    If rowNum <> 0 Then
        Rows(rowNum).Delete Shift:=xlUp
    End If
End Sub
This comment was minimized by the moderator on the site
Criei uma linha e nomeei como spotB,
Mudei a altura da linha para 0,01 para ocultá-la (apenas por estética).
Criei um botão:
Application.Goto Reference:="spotB"
Selection.EntireRow.Insert

Problema resolvido.

Obrigado pelos códigos a Mah e crystal, mas eu tinha 8 títulos para separar, cada um inserindo linhas quando necessário ao usuário, e não queria nenhuma pergunta sobre quantidade de linhas, os usuários não leem perguntas e clicam logo em OK, depois reclamam...
This comment was minimized by the moderator on the site
... Testei os códigos acima, mas, como se trata de pessoas que vão usar, não é viável os box que pedem a linha e a quantidade, não dá...
This comment was minimized by the moderator on the site
Caros colegas, após pesquisar (bastante) na net não consegui encontrar um atalho, comando, código, nada, nada, que eu possa usar para inserir em uma macro APENAS uma forma de inserir uma linha ABAIXO da célula ativa. Isto porquê se eu gravar o endereço da célula, ele não muda, fica sempre na mesma célula e as seguintes não vão ficar corretamente abaixo, e se eu usar um endereço de célula fixo, a linha tem que ser inserida acima, mas não formata da forma desejada, que seria o formato das linhas de cima.

Acho que o código existe, só não encontro, já tentei várias formas, selecionando um fixo, subindo uma linha e pedindo para inserir após, mas as seguintes não funcionam de acordo.

Alguém poderia me ajudar?
This comment was minimized by the moderator on the site
Hi

I used the code but wanted to add rows with formulas, therefore I added the last line to be able to add the rows with formulas.
However, in my excel file and in column "F" I have a text which can be entered manually and would be different in different cases. Therefore, I would like to add rows below the reference row with keeping the formulas and values in all cells except the cell from column "F" which I would like to be copied as blank!
Could you please help me with what should I add to the underneath code to be able to have the cells of column "F" blank whenever I add a row with this code?
thanks in advance!

Private Sub CommandButton1_Click()
Dim xIntRrow As Integer
Dim rowNum As Integer
On Error Resume Next
rowNum = Application.InputBox(Prompt:="Enter Row Number where you want to add a row:", _
Title:="Kutools for excel", Type:=1)
xIntRrow = Application.InputBox(Prompt:="Type in the number of rows you want to insert", _
Title:="Kutools for excel", Type:=1)
Rows(rowNum + 1 & ":" & rowNum + 1).EntireRow.Resize(xIntRrow).Insert Shift:=xlShiftDown
Rows(rowNum).Resize(xIntRrow + 1).FillDown

End Sub
This comment was minimized by the moderator on the site
Hi Mah,
The following VBA code may do you a favor. Please give it a try. Thank you.

Private Sub CommandButton1_Click()
'Updated by Extendoffice 20220707
    Dim rowNum As Integer
    Dim xRg1, xRg2 As Range
    
    On Error Resume Next
    
    rowNum = Application.InputBox(Prompt:="Enter Row Number where you want to add a row:", _
                                    Title:="Kutools for excel", Type:=1)
    
    Rows(rowNum & ":" & rowNum).Insert Shift:=xlDown
    Rows((rowNum - 1) & ":" & (rowNum - 1)).Copy
    Rows(rowNum & ":" & rowNum).Select
    Selection.PasteSpecial Paste:=xlPasteAll, Operation:=xlNone, SkipBlanks:= _
        False, Transpose:=False
    Range("F" & rowNum).Value = ""
End Sub
This comment was minimized by the moderator on the site
Sub AddNewRow()


Private Sub CommandButton1_Click()

ActiveSheet.Unprotect Password:="1234"


Dim mySheets

Dim i As Long


mySheets = Array("Sheet2")


For i = LBound(mySheets) To UBound(mySheets)

With Sheets(mySheets(i))

.Range("B10").EntireRow.Insert Shift:=xlDown

.Range("B10:H10").Borders.Weight = xlThin

End With

Next i


ActiveSheet.Protect Password:="1234"


End Sub

I don't know if this will work for you. It worked quite well for me. I even left unprotected cells that you can input data and the formulas are still active. Took me a whole day to figure it out. replace "1234" with whatever password you feel like, "Sheet2" with the Sheet you are working with and input the range you want.
The code first unprotects the worksheet, adds row and protects the worksheet.
This comment was minimized by the moderator on the site
is it possible to create in a different sheet? I really need that
This comment was minimized by the moderator on the site
can possible insert multiple sheet row at one time click by this .
This comment was minimized by the moderator on the site
Hi,
The below code can help you solve the problem. Please have a try.

Private Sub CommandButton1_Click()
Dim xIntRrow As Integer
Dim rowNum As Integer
On Error Resume Next
rowNum = Application.InputBox(Prompt:="Enter Row Number where you want to add a row:", _
Title:="Kutools for excel", Type:=1)
xIntRrow = Application.InputBox(Prompt:="Type in the number of rows you want to insert", _
Title:="Kutools for excel", Type:=1)
Rows(rowNum + 1 & ":" & rowNum + 1).EntireRow.Resize(xIntRrow).Insert Shift:=xlShiftDown

End Sub
There are no comments posted here yet
Load More
Please leave your comments in English
Posting as Guest
×
Rate this post:
0   Characters
Suggested Locations